Updated May 12, 2013: See also Part 2 of this post
here.
I'm not the first to popularize the use of discarded scraps of highway drainage culvert as landscaping elements. That honor goes to a number of folks such Austin's Pam Penick, author of the recently-released (and well-written) book titled
Lawn Gone! , which details how to successfully replace water-guzzling turf grass with beautiful and low-maintenance plantings. In March of 2013, Pam featured this
Houston Heights culvert garden in one of her blog posts, and it's an absolute work of art.
 |
| The Bayou City Garden blog featured the same assemblage in this post from 2008. Screengrab from that site. The idea is very simple: you use up-turned culvert segments in lieu of more conventional planters. |
There are many other examples, and if you do an image search for "culvert planters", you'll see them.
Houzz compiled this collection of culvert repurposings that include both indoor and outdoor usage ideas. The blogger known as "The Creative Cheapskate" published
this account which includes three small-diameter segments as accent planters.
This Wisconsin group showcased a modern twist (or maybe I should call that a modern spiral) when they incorporated culvert segments into their displays.
However, what's missing from most of those internet accounts is
building instructions. It's not difficult to turn a chunk of culvert on its end and put soil in it, but there are a few things to keep in mind if you want to get the best results from a planting perspective. And of course there's also the question of aesthetic design: how do you make a culvert, which is a very
non-traditional material, look like it belongs in your urban or suburban landscape?
With these things in mind, I thought I'd show you a few of my culvert installations, starting with this very simple singleton:
 |
The Houston Heights example shown above was constructed of metal culvert pieces, but I use high-density polyethylene (HDPE) - in this case, an 18" inner diameter (ID) scrap. This particular segment was literally fished out of a mountain of trash at a municipal waste transfer facility. Someone had thrown it away, not realizing what fantastic upcycling potential it had. This stuff gets used on construction projects, which then typically have miscellaneous scraps or "trimmings" left over that are of no further value to the project because they are too short to be incorporated into the drainage design. So they usually get tossed into trash roll-offs and hauled for disposal.
Yes, that's what I said. I spent seven years in university and got a Master's degree but that doesn't stop me from dumpster-diving if the situation warrants it. I share Jackie Chan's legendary aversion to needless waste (he's famous for washing his own socks and re-using those little hotel soap bars that most people simply throw away).
I don't know which company manufactured this particular culvert, but it appears to be similar to the Eagle Corr PE brand. |
I like this HDPE because it's so tough and pretty while also being easy to manage. When I have the good fortune to encounter a discarded scrap, I toss it into the back of my minivan and then cut it into useable segments with an ordinary circular saw. Because it's double-walled, if you carefully cut right in the valley of the ribbing (not to be confused with
a best-seller of similar name), you can achieve a nice smooth closed rim.
I also like using this black HDPE because
cross-referencing is culvert-king and it coordinates beautifully with another important landscape design element that we have:
 |
| Our basalt fountain, the installation of which was detailed in this 2011 post. |
 |
| Two disparate design elements but both characterized by horizontal charcoal grey ribbing: a match made in design heaven. |
So let's get this pipe party started, shall we??
 |
The first thing I did when installing this culvert singleton was to select my space and strip out the sod, just because I find the ground easier to level and work with if the sod is gone. It's important that the pipe be set level on the ground because it will look wonky and it will be difficult to water if it's not.
I also defined the area with polyethylene lawn edging of the type that's available in any big box home improvement store (such as this one that costs about one dollar per linear foot). Again it cross-references, because this stuff is black HDPE just as the culvert itself is black HDPE. And it makes lawn maintenance easier. |
 |
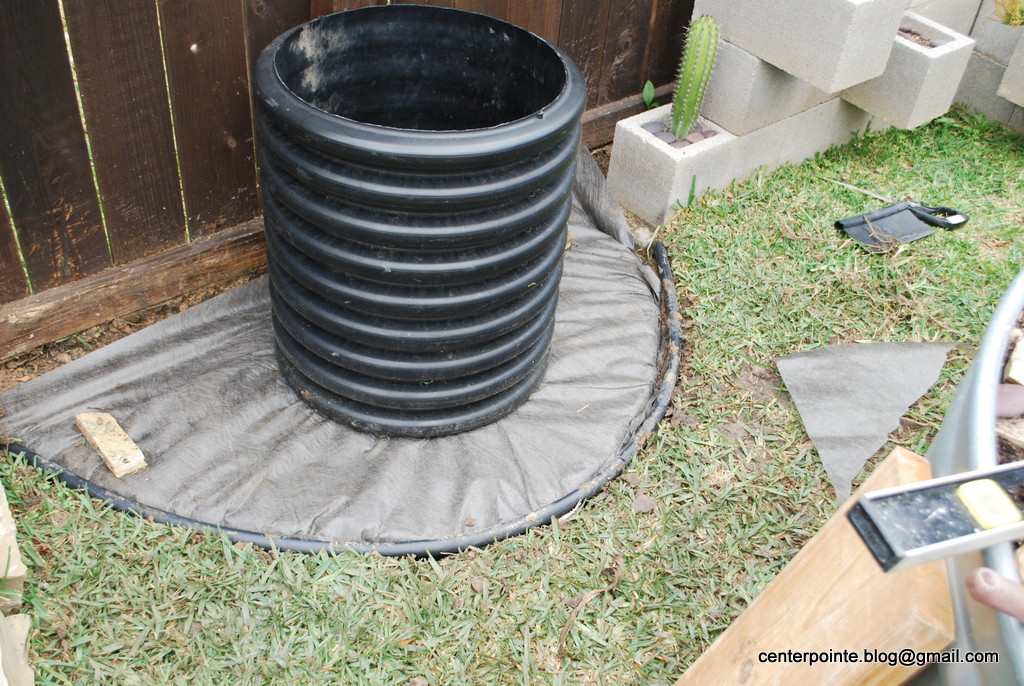
Let me say that again, just as I said it repeatedly with respect to the cinder block garden described in this post, the same garden that's partially visible at photo right: take the time to make it level or else you will have problems down the line. I leveled my soil and then did final minor leveling adjustments by pounding carefully with a sledgehammer using a piece of wood to protect the rim of the culvert.
Note also that I'd placed landscaping fabric here. This is important for preventing weeds. |
 |
| So at this point it was level and I needed to trim and tuck the landscaping fabric. |
 |
| I cut it about two or three inches larger than the HDPE edging, and then used the shovel to poke it down tightly against the inside of the lawn edging. I had to step on it in the process, so the poking wouldn't yank it out from under the culvert. |
 |
| Close-up of the result. |
 |
| Another view of the tucking result. I don't want the weed-wacker to be beating on the base of this culvert, because it would tear it up. This is why I don't set them directly into the lawn. It also looks nicer if they are framed by some kind of a base. |
 |
What I used in this case for that framing was Mexican beach pebbles. These things are like caviar for landscaping: very expensive but quite a disproportionately-rich enhancement if consumed in small doses.
The reason why I used them here, with this culvert scrap, is that they carry through the cactus garden to the right. I use them as Zen-like accent stones around the base of the individual cacti and I also set little groupings of pebbles on a few of the ledges, which you can just barely see in the upper right corner of this photo. This is another layer of stylistic cross-referencing. |
 |
| It might have been easier to put the soil in the culvert before laying the pebbles, but this is always a gratifying step and I jumped my own gun here. |
 |
| I had reserved this particular culvert for a baby Improved Meyer Lemon tree that my husband picked up from this year's Galveston County Master Gardeners annual fruit tree sale. Ultimately I want to plant this in the ground, but its root ball is currently very tiny. Therefore, I figured I'd give it a year or two to mature in this planter before I bust it loose as a standalone yard tree. |
 |
| Just a couple of remaining steps to go here. I am currently experimenting with ways to retard the loss of moisture from all of my above-ground gardens, including these culverts. Greater Houston is SO danged hot most of the year that they heat up and dry out extremely quickly, as do all of the above-ground planters that I've ever used, conventional or not. So here, for this experiment, I've first lined the upper surface with a cut scrap of landscape fabric... |
 |
...and then I piled the same beach pebbles on top.
Now, if instead you live in a cooler, wetter climate, you might want to think about what's best for your area - I don't know if covering up the surface like this would be your best option in every scenario. If you constrict a root ball too tightly, you could increase its susceptibility to a number of diseases. Thus far, knock wood, I'm not finding that I'm having trouble with root-rot or anything else in my particular climate. My big challenge is accelerated moisture loss, so I'm trying stuff like this to see if it improves the situation. |
So there's a description of how I installed my singleton culvert, and I'll detail my other more complex configurations in future posts.
Updated May 12, 2013: See also Part 2 of this post
here.


No comments:
Post a Comment
I'm forced to moderate comments because the spammers have become too much for me to keep up with. If you have a legitimate comment, I will post it promptly. Sorry for the inconvenience.