***UPDATED April 5, 2013 to include building instructions and also to discuss fire ant control strategies for cinder block gardens located in the southern United States.***
Those of you who (a) garden and (b) follow internet garden websites or DIY home improvement channels may know that "cinder block gardens" are one of the hottest residential landscape design trends right now.
I could not resist jumping onto that particular bandwagon, although my resulting design is more elaborate than most of those that have come before.
 |
| A new innovative use for very old and very cheap materials. |
Holy cow, this has been one of my longest-gestating projects
ever. It looks so simple - erect a bunch of cinder blocks to create a wall-like pocket garden for small cacti and succulents (or other types of plants if you prefer). It turned out to require an unusual amount of planning and labor - but for a result that was well worth it, as the following sections will show.
My intention was to take the wonderful ideas initiated by numerous blog sites such as Apartment Therapy...
...Pocketgrow...
...and Moscato Mom...
...and move this concept to the "next step". This is
THE neatest thing about the internet community: someone gets an idea, produces it, and then others proceed to build upon it in new ways that everyone can ultimately benefit from.
I started this project by testing new ways of designing it, specifically, by using Lego blocks to try various lay-outs, Legos being much easier to lift than cinder blocks!
 |
| This was one of my final designs in miniature, looking down at a representation of the yard corner where the cinder block creation was to be placed. |
However, what I found in practice is that the Lego didn't give me as much "feel" for the project as I had hoped it would.
 |
| Here's where I started "dry fitting" the cinder blocks into the space per my Lego design. Immediately it became apparent to me that the square central planter just did not look right in this space. It was out of proportion to both the space and the cinder block "walls" that would flank it on both sides. |
 |
Incidentally, it also became apparent to me upon dry-fit that the back side of the stacked-stone neighborhood fence accent had to be neutralized. Our yard backs to a public street, and our fence intersects one of these decorative units. They look great when viewed from the public space because all you see from that direction is the stacked stone facing. But on our side, mostly what we see is the yucky peach-colored cinder block supporting structure.
With this in mind, I obtained a fairly close paint match for the existing fence stain. An exterior latex paint will work for this kind of thing.
DESIGN HINT: Good contemporary design often succeeds by balancing rugged elements with sophisticated elements. A cinder block garden wall is going to be a rugged element. Therefore, if you want to maximize the artistic impact, surround it with relatively sophisticated elements. Paint or stain any fence backdrop in the field of view to add such sophistication.
|
So given the limitations of the Lego approach, I had to go back to the drawing board and actually dry fit the cinder blocks into the space, trying numerous configurations until I found one that was satisfying.
 |
NEXT DESIGN HINT:
Once you decide upon your layout, make a sketch or take a photograph of it. I took photos and then printed them out so that I had a "go by" in front of me at all times while I was building. |
OK, now the step-by-step instructions:
 |
My revised design ended up retaining the central planter, but had a zigzag pattern in it to soften the weight of it. I left the dry-fit cinder blocks in place on the ground for a couple of weeks (could not build due to bad weather), and by the time I had started construction, the blocks had killed the grass underneath their footprint. For this reason, it was extremely easy to excavate the sod once it came time to build. The blocks left an easy trace to follow.
Once I got the sod excavated, I used a sledgehammer to compact the earth underneath it.
|
 |
| Sand fill was added to the excavated areas as part of the leveling process. |
 |
| This is a critical step: I used 8" x 16" flat pavers to form the foundation of the structure, but they had to be set precisely level or else the entire structure would have been out of whack. My engineer husband assisted with this part of the task. |
 |
| Let me stress that again: They have to be absolutely level in every direction. The entire structure must sit within a flat plane. It's going to be extremely heavy, and if it is leaning in any direction, the gravitational forces are going to cause it to want to crack and/or topple over eventually. That would be a safety hazard as well as spelling the ruination of the project. |
 |
Let me stress it a third time: Make it level. Here, my husband is using a sledgehammer to assist with compaction. He's using that piece of 4x4 lumber to distribute the compaction forces evenly over the pavers. If you simply try to pound the pavers directly with a hammer, they will split.
This foundation step could also be accomplished by pouring a level concrete footing. But I am always hesitant to pour concrete because I never know which projects I will want to keep for the long-term and which are going to end up being do-overs.
|
 |
Once the foundation was completed,we started to add the bricks per the dry-fit design. We used construction adhesive to hold the entire thing together. As several previous bloggers noted, this produces a more contemporary seamless look than using mortar.
DO NOT seal the entire perimeters of the joints with construction adhesive. You are going to want to leave some sides unsealed so that water can drain out of the structure. |
 |
| This is the adhesive that we used, obtained from Home Depot. It seemed to be very strong and good for the job. |
 |
| Prior to buttering with the adhesive, we used a wire brush to remove loose material from the bottoms of the cinder blocks... |
 |
| ...and a nylon brush to remove dust. |
 |
We used pea gravel to fill some of the cinder block channels for added support. I don't think this is necessary, but we had extra pea gravel left over from a previous project, and so we used it like this.
April 5, 2013: Retrospectively, I would suggest that you NOT include this step. See notes regarding ants in the final section of this post. |
 |
| We worked our way up the design, referring constantly to the previous photographs that we had taken of our "dry fit". Depending on the complexity of your design, it might be worth taking photographs of each level as it is dry fit. It can be surprisingly tricky to replicate a dry fit from memory. |
 |
| My design differed from some of the others on the Internet in part because I used capstones (8 x 16 pavers) throughout it. It is important to note that you're not going to be able to achieve precise fits with this stuff -- cinderblocks were designed to be put together using mortar, not construction adhesive, and their size tolerances reflect that fact. An 8 x 16 cinder block is not exactly the same size as an 8 x 16 paver (what we found is that the pavers were slightly larger than the blocks, as shown above). You will need to tweak your design as you go along in order to make everything fit together in a visually pleasing way. |
 |
| Once we got the structure assembled, it was time to line the bottom of the cinder block planter holes so that the potting soil would be retained within them. There are a couple of different ways to do this. Some previous posters used broken sections of pavers and wedged / glued them into place. That struck me as a lot of work, and very heavy besides. Blogger Sunny used cavity caps, but we found two problems with that idea: (1) The do not seem to be available anywhere in the southern United States at this time (I did the research), and therefore if they are used, they have to be ordered out of suppliers in the eastern United States (2) Although they are galvanized, I was worrying about the rusting potential because, again, they are designed to be used in the conventional manner with mortar, which would largely seal them from the environment. The last thing I want to eventually have is a bunch of rust streaks down the sides of my cinderblocks. For these reasons, I decided to try less massive hardware cloth that I could line with plastic. It still could rust, but there's less of it. |
 |
| The adhesive that we used seemed to be really strong, and so this is how we attached the pieces of hardware cloth into the bottoms of the cinderblock cavities. |
 |
| This is maybe overkill, but I also cut strips of plastic to use as liners inside each of the cinderblock cavities. I also added a bit of pea gravel to the bottom of each, the way you would add it for drainage to a regular flowerpot. |
 |
| The large central planter bed was easy to fill with soil, because I mostly re-used the soil that I had excavated for the foundation pavers. That excavated soil consisted largely of the sand fill that had underlain the grass sod, so it was perfect for cacti and succulents. |
 |
| Before adding that soil fill, I used plastic to line the bottom part of the planter bed. Again, this may be overkill, but I was worried about water leaching out through the sides, because cinderblocks are so porous. I did not want water leaching out and making mineral stains as it did. |
 |
| I also added landscape fabric to the bottom, to discourage weeds. |
 |
| On top of the landscape fabric, I added a layer of pea gravel for drainage. This is also a good place to get rid of your scraps of broken stone and pavers. |
 |
| Soil mix for planting cacti and succulents: Several websites recommend a mixture of sand, potting soil, and peat moss in equal proportions, so I did that. |
 |
I blended these components together in a wheelbarrow.
Note that, while individual cinderblock cavities are not large, I had eighteen of them in this design. Cumulatively, they consumed an entire wheelbarrow of mixed soil. |
 |
| I also blended cactus soil for the final top layer of the central planting bed. |
 |
| I had been collecting cacti and succulents throughout the winter from a variety of big box stores. Usually during the winter months, they go on sale for very low prices. |
 |
OUCH! The moment of truth as each specimen was planted in its respective block cavity.
DESIGN TIP: I structured the central front planter with capstones (pavers) so that it could also be used as a bench, and it does work very well as a sitting area for two. I was very careful to plant the spiny cacti in areas AWAY from the bench, and to use the softer succulents in the block cavities nearest to the bench, so that visitors would not accidentally brush up against any spines!! |
Let's see the final result from one more angle:
 |
And voila - the final product!
Note how the dark fence sets this off nicely. If the fence behind it had been shabby, it would not have looked as sophisticated, for lack of design balance.
Note also that I used capstone pavers for more than just the foundation and the front bench - there are several lines of them inserted into the structure itself. These break up the "holey-ness" of the cinder blocks and provide ledges upon which to put drinks, for instance (such as that well-deserved pot of green tea to photo right).
Incorporating cinder block singletons (8x8 blocks rather than all 8x16 blocks) also breaks up the monotony and adds interest. |
Materials and approximate DIY cost* of this project:
- 8 x 16 cinderblocks: approx. 50 blocks @ $1.46/block = $73.00
- 8 x 8 cinderblocks: approx. 10 blocks @ $1.08/block = $10.80
- 8 x 16 pavers: approx. 25 pavers @ $1.31/paver = $32.75
- Construction adhesive: 6 tubes at $7.50/tube = $45.00
- Peat moss (only about 15% of the bag was used): 1 bag @ $9/bag = $9.00
- Potting soil: 1 bag @ $7/bag = $7.00
- Construction sand: 6 bags @ $3.50/bag = $21.00
- Cacti and succulents: 23 plants @ average approx. $2.50/plant = $57.50
TOTAL: approx. $256.00
(* Approx. retail prices in Houston Texas in February 2012. Note that the block counts I did above are rough counts made after the structure was completed.)
Thanks for viewing!! If I have any follow-up comments or hindsight lessons, I'll amend the post in the section below this line.
ADDED APRIL 5, 2013:
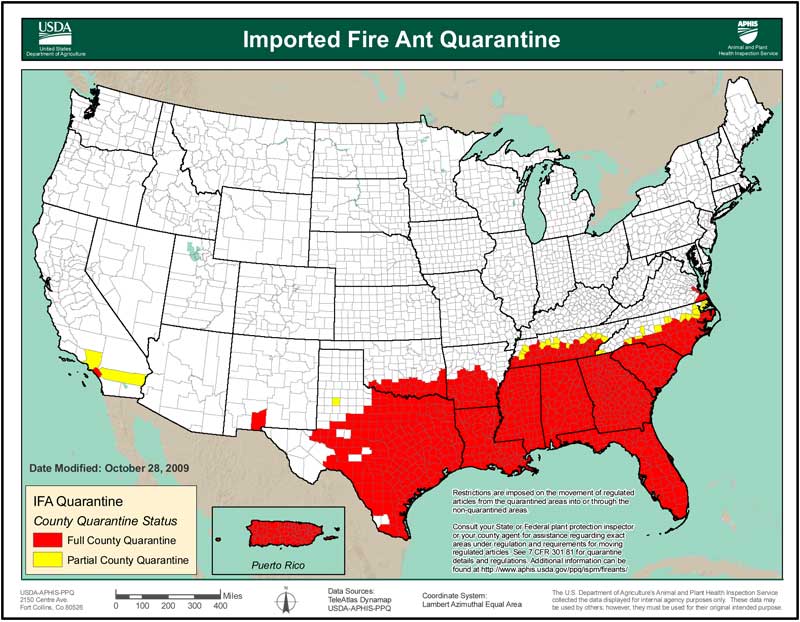
No new design proves to be 100% perfect from the outset, and this garden is no exception. Structurally and horticulturally, it has performed better than expected - but I'm in greater Houston, and we have to live with an intense outdoor menace in our area:
invasive South American fire ants.
 |
They are a scourge upon these United States.
Screengrabbed from this TPWD site. |
And, oh my word, the
misery they have caused me here. Retrospectively, I should have constructed this cinder block garden with some potent fire ant poison
already embedded within it. To date, I have used no chemical pesticides anywhere near my food-growing places, but I may have to make an exception for this cactus garden because my organic pest control methods are very labor-intensive and have only been semi-effective to date.
 |
For the past several years, I have successfully used neem oil to keep fire ants out of my vegetable stock tanks. Neem oil does not kill fire ants, but it interferes with their sense of smell, so they cannot tolerate it. It drives them away very efficiently.
However, stock tank gardens are very open and accessible and easy to treat. In contrast, the cinder block cavities create closed environments where it's very difficult to reach the ants... |
 |
...especially in those portions of the garden which are covered by capstones. Open cavity columns can simply be treated by pouring a diluted neem oil solution from above and letting it percolate all the way to the bottom. But where capped, I had to retrofit those columns with tiny holes drilled using a masonry bit.
Do you see the tiny circular hole to the left of the shadow? |
 |
| This is me squirting the diluted neem oil solution into that hole using an old dish detergent bottle that I washed out for this purpose. |
 |
| I also have to do the same thing between the gaps in the cinder blocks, because the fire ants will seize ANY untreated area as a nesting foot-hold, no matter how small. |
The neem oil works, but it has to be re-applied very frequently (whereas I find that I can treat a
vegetable stock tank and thus be done with ants for months to a year at a time). And, as I noted in
this other post, neem oil is very expensive. I may bite the bullet and inject the cinder cavities with a conventional chemical pesticide in order to win this particular war, because I have no plans to ever grow anything edible in this cactus garden.
Aside from the misery that the ants have caused me, watching this garden grow has been wonderful.
This post shows some of the blooming results from spring 2013.
 |
| Into every southern suburban life, a few ant problems must fall. But incredible beauty also falls. |


i enjoyed reading you step by step instruction. i live in Sugarland and plan on building my cinder block planter/ kitchen table during the 4th of july weekend.
ReplyDeleteGreat work! thanks for teh detail.
Thou art brave tackling a project like that during the heat of the southeast Texas summer! :-)
ReplyDelete