
Case in point: the unknown contractor who originally plumbed our kitchen sink.
 |
| Indeed. A very concise set of instructions on how to deal with the proverbial dastardly "builder grade" effect can be found here, whence this screengrab derived. |
Number one - It was a hellaciously expensive option. I can't remember the exact price, but I believe it was between $500 and $1,000 in upgrade fees.
Number two - I've seen too many examples among my friends where the edges of their granite sinks have chipped. And once that happens, the entire countertop looks like crap.
 |
| Oh, that just SUCKS. Sure, you can sweep your crumbs directly into an undermounted sink bowl, but what good is it if you run the risk of having this happen? I do very intensive cooking, lots of volume, large pots banging around. I don't want to have to pussyfoot around my sink for fear of damage. Screengrab from this site. |
 |
| Caption from this UK educational site: "Most homes still had an outdoor toilets. Some were flush toilets connected to the sewerage system, others, particularly in the countryside, still had to be emptied into a cesspit." |
 |
| I'm sorry - I don't want my sinks to remind me of pit toilets. But that's just me. Screengrabs at random from Google image search. |
 |
| Particularly with smaller undermounts, when I see them, I want to run away because of that visual resemblance. |
So we ended up choosing a traditional drop-in kitchen sink, but of course with undermount sinks being all the current rage, there wasn't much of a choice on drop-ins. So we just got whatever the builder default was.
Sigh. Now for the part of the story that has been laced with expletives since the very beginning.
As soon as the contractor installed our default sink, we knew something was wrong. Initially, they simply set the thing into the rough opening with no putty or caulking, which meant that the edge was not sealed, not waterproof, and thus would be expected to leak water into the cabinetry beneath.
Upon seeing this, I raised hell with the builder, who forced the contractor to go back and seal it. Or at least make a feeble attempt to seal it, because this is what got done.
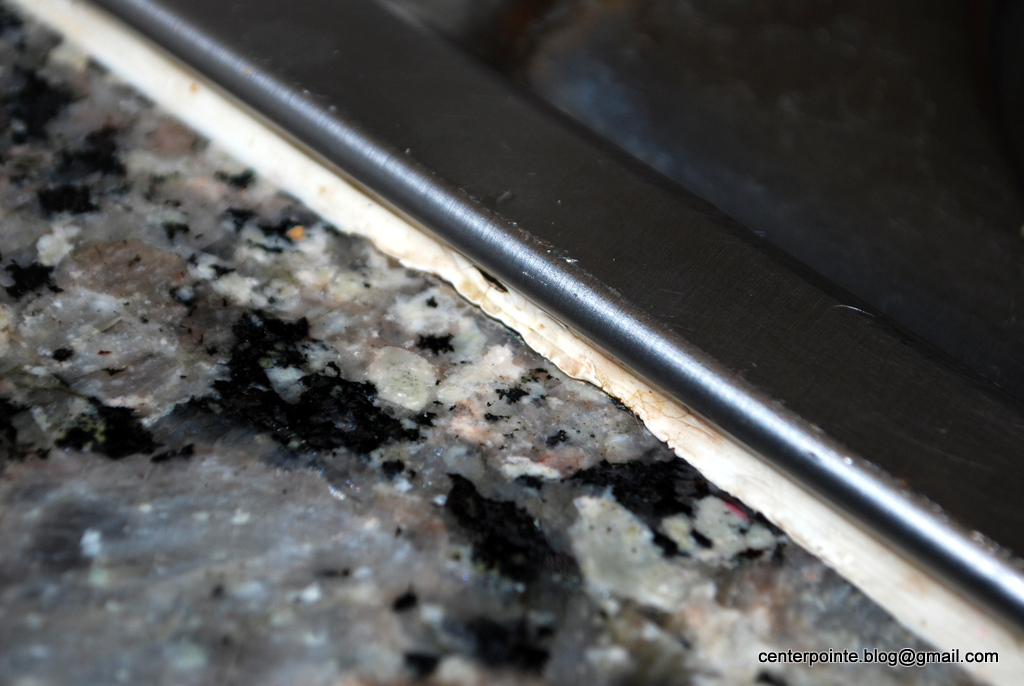 |
| Did I mention the word SUCK?! For crying out loud - this unknown material might be either acrylic or latex or something else, but it's not silicone and it wasn't suitable for this wet application. You can see here that it doesn't form a tight seal with either the granite or the stainless. And it's cruddy, not to mention unsanitary. I had to constantly be careful that no water would slop on the counter, because it would have run right under this edge and into the cabinet below. |
 |
| A study in sealing contrasts only one inch apart: The tiler had sealed the base of the backsplash (photo left) in clear silicone, a very neat and effective job which looks as good as new three years after it was done. Whereas the plumber had attempted to seal the sink edge (photo right) using this white gunk which quickly fell apart. |
"Down the road" finally translated into last weekend. As consummate DIYers, we figured that this would be an easy job - just unclip the sink, putty it up properly, and replace. But as soon as we started to pull it, the whole thing became increasingly odd.
 |
| Sink configurations vary, but generally, there are clips up underneath the sink, holding it in place. You unscrew those to release it. |
 |
| Here's the corner of our sink, which is shown here propped in place by a short length of wood. We had to first clean all that white gunk from around the edges. You can see two of the clips here - one on each side of the corner. |
 |
| But then we noticed that only the corners of this sink had been clipped during the initial install. There were clip slots in the centers of each side, but no clips in those slots. |
 |
| We were initially figuring that we wouldn't even bother with caulk - theoretically, we could simply use plumber's putty and re-set the sink in that for a water-tight seal. But it kept not working for some reason. It wouldn't set properly no matter how much we adjusted it. So we pulled the sink back up a second time to examine it more closely, only to find... |
 |
| Oh, that SUCKS!! That just *SUCKS*!! The danged sink rim is not planar. It won't sit flush with the top of the counter because the entire unit is warped. The resulting running gap varies from zero to three-eighths of an inch around the perimeter. |
Sigh. What did it say in the quote about "builder grade" in the opening screengrab above? "You'll save money in the end by buying better-quality building materials". Now we have to decide whether we want to live with this, or repurchase a better-quality sink that actually was manufactured with sufficient quality such that it sits flush with the countertop and thus can be water-sealed in a sanitary manner. In the meantime, we crammed our existing sink's gaps with clear silicone caulk, but it's not a very effective solution. Really, the sink needs to sit flat in the counter opening for it to function properly.
Grrrr. What an unnecessary headache. I've faced a lot of home improvement oddities in my time, but never a stainless steel sink that wasn't constructed in plane.
No comments:
Post a Comment
I'm forced to moderate comments because the spammers have become too much for me to keep up with. If you have a legitimate comment, I will post it promptly. Sorry for the inconvenience.