Saturday, March 31, 2012

Landscaping Made Easy, Part 2: Italian Cypress

Thou shalt not covet thy neighbour's wife, nor his manservant, nor his maidservant, nor his ox, nor his ass, nor any thing that is thy neighbour's.

Except for maybe thy neighbor's Italian cypress trees?  Probably no harm in coveting them, because everybody else does!!
:-)

I ranked Texas wax myrtle as my favorite landscape plant for Centerpointe because of its intended-size versatility on small subdivision lots, because it grows so fast, and because of its hardiness (it's native, drought tolerant, and almost cannot be killed by neglect). 

However, I did note that wax myrtle is more of a utilitarian tree / shrub than a real showpiece.  If you want a real "bling" show-stopper tree on a small lot, your choice might be Italian cypress.  I have gotten more compliments on our increasingly-majestic Italian cypress trees than on any other element of our landscape design.  They grow UP instead of OUT, which makes them particularly well-suited for tight spaces. 

And they also grow UP very quickly:
This is what three of our current six looked like the day they went into the ground (I say "three of our current six" because I fully intend to plant more in the future). 

You can see underground utility lines marked on the ground in orange paint.  Our yard, like just about every yard in Centerpointe, has a utility easement in the back yard.  Anything planted in such an easement is planted at the homeowner's risk, which was my motivation for making sure that these trees were planted on either side of the existing lines, rather than right on top of them (such a strategy is not a guarantee of no future disturbance, but it might work to my advantage in helping to preserve the trees at some point in the future if the utility companies need to access these lines... bear in mind that if the lines DO need to be accessed, it will likely be many years into the future, so even if I lose a few trees and shrubs, we'll get to enjoy them in the meantime). 

I have a separate post detailing how to deal with utility easements
Here's what they look like about eighteen months after planting:
Look at how much the little ones in particular have grown in such a short time.  They looked like toothpicks when I first put them in.
Bear in mind that this growth also took place during one of the worst droughts in recorded history.  We put six Italian cypress into the ground; five survived last summer.  I did water them regularly, but special care is really only needed for the first year or two until their roots get established, because Italian cypress is impressively drought-tolerant.  My husband and I were amazed to see this tree positively flourishing in Presidio, a west-Texas desert city which has an annual rainfall of about eleven inches (compared to the normal forty-five inches or so that we have here in League City). 
When is the last time these guys have likely seen any TLC?!

Screengrab of a Presidio street scene from Googlemaps.
Another example of Italian cypress life in the desert, the land where lawns do not exist. 
Much closer to home, here is that group of Italian cypresses on State Highway 96 at the train bridge.  Some of them look ragged at this point, but you have to remember that they never received a drop of water for months and months last year, while at the same time enduring about a hundred days of 100-ish degree weather.  Those were unprecedented extreme conditions that took a terrible toll on every kind of landscaping.  The fact that these survived at all, apparently unassisted, is a testimony to their strength. 
Now, you may be wondering about the cost of these things, and also how to get them home if you are installing them DIY. 

Part of my purpose in writing these posts is to demonstrate that cost is not an excuse for not installing landscaping.  Again, we bought our cypress trees in the autumn, when the nearby Houston Garden Center has its annual 70% off sale.  That means we paid about $30 for each of the smaller (six-foot) cypresses, and $100 apiece for our two largest (12-foot) ones.  And you can see how nice the $30 ones look just 18 months after installation.

Thirty bucks?!  How could you possibly do better than thirty bucks apiece for starter trees that quickly become majestic?! 

This is another reason why I'm not concerned about the future potential for loss if the utility companies need to dig in our backyard easement.  I paid so little for most of this stuff and I get to enjoy it between now and whenever.  If some of it is eventually killed by utility work, I'm not going to lose a big financial investment.

And not only that, the little ones can be taken home in the back of a minivan or pick-up truck - you don't even have to pay for delivery if you're DIY-ing.  The big ones may be a bit more of a challenge...
For about $20, you can rent a trailer from that U-haul place that's a stone's throw from Centerpointe.  We did this because we simultaneously were hauling large Texas wax myrtles.
Check and verify that they still have trailers for rent.  I believe this is where we rented the one we used.
There's another option for these trees: dense planting for privacy screens.  We don't yet see this practice very much in Texas, but it's been popular in California for years:
Very tasteful integration of a privacy screen, from http://www.norcaltreeandstump.com/before-and-after-3.php
Speaking of the local Houston Garden Center, obviously if you wait until their annual fall sale, you won't be getting the pick of the litter on many plants.  If you want to guarantee that you'll get what you want, the time to buy is at the top of the season, which is right now.  It's neat to go over there and simply walk around - last week the smell of all their roses was just amazing.

The other local horticultural outlets that I enjoy are as follows:
  • Maas Nursery.  It's top-notch in terms of quality and is not a "big box" style establishment, so you'll pay for that quality, but wow, what an experience just to walk around in the place.  I tend to buy a lot of smaller specialty items at Maas.  They have good prices and unbeatable selection on hanging baskets and patio plants, for instance (often $15 - $25 apiece for really large, unusual centerpiece-type plants that are difficult to find in big-box stores). 
  • Caldwell's Nursery.  This is the best one I've seen overall in greater Houston, but you have to drive to Rosenberg to visit it.  They specialize in bamboo, about which I'll post at a later date. 
So there you have my opinions on, and experiences with, Italian cypress.  Happy planting.
:-)
For sale to good homes needing wonderful landscaping.

Thursday, March 29, 2012

Reduce, Reuse, Re-psych-le

I always like to follow up on individual resident questions by posting the answers in this blog, so here's a good one. 

Have you ever walked out of your house only to find something like this in your front yard?
That happens in part because League City is still using those old-style open-topped recycling boxes:
These things are a pain in the following ways:
  1. They allow pizza boxes to blow freely in the wind.
  2. You can't really put paper products in them on days when it rains.
  3. They can't really be stored outdoors (e.g., behind your fence) with your regular trash can, because they will get rained on.
  4. They don't hold much.
  5. They don't hold larger objects at all.
  6. They are often difficult to carry when full.
A few years ago, I lived in the Pineloch community of north Clear Lake, which was one of the City of Houston's original pilot areas for testing those wonderful rolling 96-gallon recycling bins that are similar to trash totes:
The green one pictured here.  This is an old press photo from City of Houston's launching of their recycle program (I can't find a URL for it now).  City of Houston has been proactive with residential curbside recycling. 
I guess I got spoiled by those convenient green rollies because when I moved to League City, I was not willing to revert to using those nasty little totes.  However the trouble was, I could not get the AmeriWaste collection guys to recognize recyclables placed in any other container.  Every time I'd use something other than the red bin, they'd dispose of the material as trash instead of recyclables.

So I decided to do this, to psyche them into it:
Red is the magic color for this city, so I took one of our two existing rolly carts and spray painted it red...
...then I downloaded a recycling symbol (this one from Wikipedia), sized it, printed it out, and used a razor blade to cut out the arrows.

I then taped that to the side of the red-spray-painted trash can, and used it as a stencil to spray paint the symbol in white paint.
You could buy one of these recycling things from a big box store...
Ones like this are available at Lowes.
The trouble is, those for sale commercially are not red, and red is clearly the magic color for recycling in League City.  I don't know if collection personnel would accept this model as a recycling container.

Furthermore, those for sale commercially are expensive - the one pictured above is about eighty bucks.  I had an extra small trash bin on hand, so it only cost me six bucks for spray paint.

So there's the answer to one resident's question: how come I'm the only one in the neighborhood who enjoys the convenience of an upright, wheeled recycle container?  Because I made it myself.
:-)

Incidentally, if you need info on what materials League City accepts for recycle, you can find it here.

Tuesday, March 27, 2012

Crime: Jan 1 - March 27, 2012

I realized today that it's been a long time since I've attempted to synthesize online crime records as they apply to Centerpointe, so I thought I'd do that now.

Here is the screengrab from Crime Reports showing their compilation of recorded incidents so far this calendar year:
Just one incidence of a reported crime, that being family violence ("A"), inside the neighborhood.

One of the theft cases at the nearby apartment complex (lower right corner of screengrab) is noteworthy because it was described as theft of a brass backflow preventer.  Thieves often sell those as scrap metal for cash.
I'm not sure that all of the local police reports are making it onto this website referenced above, however.  If I check with local police blotter reports, I sometimes find additional stuff, such as the following...
Reported for January 8, 2012.
Sounds like it could be an interpersonal dispute.
...and the following:
Reported for March 19, 2012.
The exact site is not stated, but it could very well be the new Shell gas station being constructed at 1114 W. League City Parkway.  There's not much in that block that it could be, given the level of development in that area.  And construction sites tend to attract crime because they are unstaffed after dark and because they often have valuable stuff such as copper pipe and water heaters lying around untended. 

I don't routinely check published blotters in detail.  I just happened to notice those two entries. 
So it's worth noting that there were two metal thefts in our immediate surroundings recently.  This is something that most private residential owners have not historically had to worry about: theft of copper in particular from air conditioner units.  Homeowners have not had to worry about it, but there have been numerous high-profile cases of larger systems being ransacked, such as this one.  That article reports that Houston Police Department handles about 40 air conditioner theft cases per month. 

Anyway, as always, keep an eye out for persons who might be appearing where they ought not to be, especially if they happen to be loitering near an a/c compressor or hose bib.

UPDATED March 28, 2012:  After I finished writing this yesterday, I remembered the back-flow device for the neighborhood irrigation system, the one that was stolen from near the junction box at the intersection of Centerpointe and Willow Pointe.  This was described in the neighborhood newsletter of February 21, 2012, and was yet another event that also did not make it onto the Crime Reports website that I typically access.  Apparently it was hundreds of dollars out of our pockets to replace this thing.

I went back to double-check the other backflow listing and sure enough, that was reported as a separate incident with a separate address:
From Crime Reports website.
As they say, once is an accident, twice is a coincidence, three times is a pattern.  Clearly, someone in the very immediate area is intent on stealing metal fixtures.  Keep your eyes wide open.

Sunday, March 25, 2012

Check out tonight's sky

Very striking configuration lighting up the western sky this evening:
Sort of like a backwards cosmic "L" framed by those wax myrtles I mentioned two days ago.
Checking with Earthsky reveals that this represents the following alignment:
http://earthsky.org/tonight
The site headline for March 25 read, "Moon and Jupiter closest in west after sunset"
Anyway, I'd say this enchanting alignment represents a very fitting end to a spectacular weekend, weather-wise.  In the spring and fall, Houston's weather can't be beat!
:-)

Friday, March 23, 2012

Landscaping Made Easy, Part 1: Wax Myrtle

Update April 27, 2013:  See also this subsequent post regarding the management of wax myrtle trimmings. 

In a posting last September, I described my first impressions of Centerpointe, from back when my husband and I were searching all over Clear Lake for a home.  Those first impressions weren't very favorable because of the utter lack of vegetation visible even in sections of the neighborhood that are several years old now.  My first impression was that Centerpointe was perhaps the kind of subdivision where people throw up tract homes and then fail to incrementally improve them, which is the kiss of death for real estate values.  I even compared my first impression to Alcatraz!
This is a screengrab from that post, comparing the rows of houses looking at each other to rows of prisoner cells looking at each other.
That description may seem very harsh, but I wanted to be totally honest about how I felt it compared to other options.  I was a house-shopper at that time, looking at many different neighborhoods.  Did I see the same absolute lack of vegetation in other subdivisions?  No.  Look at nearby Victory Lakes the next time you drive down West Walker Street, for instance.  It is also a newer subdivision, so naturally there are no huge trees there yet.  But what you do see is homeowners making an effort.  There's STUFF in many of their back yards.   Small but well-established trees and bushes adding privacy, that kind of thing.

You might want to argue that Victory Lakes is a higher price point neighborhood and that's the reason for the difference.  I'm here to dispel that kind of conclusion.  Good landscaping is extremely cheap if you're smart about how you obtain it and grow it. 

So what I'll do now is begin my originally-intended series of posts to describe landscape plants that I feel are most suitable for a neighborhood like Centerpointe. 

Number one on my list of recommendations is Texas Wax Myrtle.
They have an amazing fragrance.  Sort of like basil.
But don't take MY word for it - go to the second paragraph down in Houston landscape guru Randy Lemmon's list of "Ten Most Underutilized Landscape Shrubs" and read what he has to say about it. 

Several homeowners have expressed their frustration to me because they feel they don't know what type of trees or shrubs would actually FIT into their tiny back yards and still provide some privacy while not overwhelming the space.  Wax myrtles fit that bill perfectly, because they are so malleable: they can be trimmed any which way you want.  If you want to maintain them as small shrubs, you can do that.  If you want them to form a tall screen, they'll do that.  If you want a small tree, you can train them to be small trees.  If you trim them one way and don't like the job that you did, just wait a month or two and they'll fill back in again and you can then start over. 

They can be grown in raised mulch beds or as standalone shrubs put directly into the ground.  Speaking of mulch beds, there's no trick to creating them, but let me run through the basic steps here anyway, for the benefit of any new homeowners who have never done it before:
First you decide where you might like your backyard raised bed to be.  I laid a garden hose on the ground and moved it around in order to get it the way I wanted.  Those two largest plants in this photo are two of the wax myrtles we installed.
After deciding on the bed lay-out, I used spray paint to mark the edge...
...then pulled up the grass sod where the beds were to go (use a shovel and cut it out square by square - it's really good exercise.  Don't plan on doing it quickly - it's a lot of work, but you have to get the grass out so it won't poke up through the mulch).

After the sod has been stripped, dig holes for each of the plants.  Holes should be about 1.5 times wider than the plant, but the top should be flush with the soil top so it can "breathe".  You can cover the top of the root ball with mulch, but most new plantings should not have the very tops of their root balls buried fully into the soil. 

Once everything is planted, simply cover the entire area with a few inches of mulch.  You can also place a landscape fabric between the soil and the mulch if you wish (I did not) to further suppress weeds from coming through. 

Mulch can be bought in bags at the hardware store, or for a cheaper solution, you can order it for about twenty or thirty bucks a cubic yard (a cubic yard is a lot!!) from local sales outlets such as Living Earth down off FM 646 (1000 Dickinson Ave).
One of the benefits of wax myrtles is how fast they grow:
Compare top of six-foot fence with top of wax myrtle.  This guy was barely over six feet tall when he was purchased (remember, in the photos shown previously, they were in their plastic containers, which added over a foot to their height when placed on the ground).  A year and a half after planting, and after surviving one of the worst drought years in recorded history, these suckers are nine feet tall

It will form a uniform hedge if you want it to.  I trim out the bottom growth and sideways growth to encourage additional height.
The only potential drawback that I see with this plant is that it would be a bit more difficult to create a manicured look to it, if that were your goal.  They are a bit scruffier than some other screen or small tree choices.  But they are native to Texas, very drought-tolerant, they smell good, they are disease-resistant, and they grow like crazy.

And they're fairly inexpensive.  If you go to Houston Garden Center on IH-45 just south of League City Parkway at this time of year, which is the absolute peak season for landscaping sales, the relatively large size pictured above might be as much as $300 per container.  But we bought in September, when almost everything at Houston Garden Center goes on sale for 70% off (Houston Garden Center is well-known for it's annual 70% off sales!), so we paid about $100 apiece for ours.  Which are now nine feet tall.  What else could grow into an opaque nine-foot hedge within 18 months and cost so little?  Very few other choices. 

It takes a bit of work to get them in the ground, but it's well worth it.  And you really don't need to go to the trouble of putting them in raised beds if you don't want to.  Just dig a hole and pop them in, and they will likely do fine. 

Or perhaps add the raised bed around them at some point in the future when you have the time.  The important thing with landscaping is to get the plants themselves installed as soon as possible after buying or building your house.  You've heard of the time value of money?   Well, the same principle holds true for plants, which is why I was initially so dismayed to see so many areas of Centerpointe still without a single leaf of vegetation.
Mysterious-looking wax myrtle seeds.
There's a house behind us, but you can't see it.
That's because we're providing privacy for our owners,
who only paid $100 apiece for us.

Thursday, March 22, 2012

Painted into a little boxy corner

Sigh...  After you closed on your Centerpointe home and walked into it for your first glorious time, or when you bought it from someone else, did you note the presence of a cute little cardboard box with four tiny paint cans in it??  (Or maybe slightly more or fewer cans depending on the initial color choices for the home).
Hello.  I'm your home's paint samples left behind by your builder's original painting contractor.
Those would likely have corresponded to:
  1. Interior wall paint color sample
  2. Interior ceiling paint sample
  3. Interior gloss trim sample
  4. Exterior trim color(s). 
The only trouble is, the painting contractors generally leave samples but not the corresponding color formula information.  Therefore if you need to have an extra gallon mixed up, you have no hard formula to refer back to.  Instead, you have to take a sample to a hardware store and have them do the best they can to match it for you.

This is a woefully-inefficient hassle to say the least.  And the hardware store usually can't make an exact color match, so it may not look right unless you carefully blend it out when applying to your existing wall or ceiling.  There doesn't seem to be a way to accomplish this, except the long way.  I've checked my contract docs, and I don't have any information on paint formulae.
All up on the order board:
I made records of the brand information for almost everything (tiles, granite, cabinet finish, etc.) that we ordered in the Meritage Design Center, aka Studio M, but I don't recall there being any technical or brand information on the two interior paint samples (little rectangles at upper right, perched on top of the tile samples).   
I've gone through this manual matching process so far with our two interior Meritage shades, with corresponding near-formulations as follows:
  • Meritage interior ceiling white (apparently a universal shade, color name not stated) - translated into Valspar Interior Flat Finish 101-2.5, 107-7.5, 115-0.5
  • Meritage interior wall color ("mocha") - translated into Valspar Interior Flat Finish 107-20, 101-8, 109-2.  (Section 9 Meritage buyers note that there were three standard choices:  "mocha", "desert castle", and "botany beige").
The hardware store matched those two well enough for me to use them, but now I need our exterior color, which is what Meritage named "Squirrel", which is a taupe-looking color chosen by a number of Section 9 buyers.  Can I find third-party references to "Squirrel" anywhere on the internet?  Nope!   But as I noted in a recent post, Google is now so refined that, if any other Meritage buyer anywhere in America goes looking on the internet for information about the "Squirrel" paint color, they will surely come across the post I've made here.  Which, of course, is one of the reasons why I'm posting about it.  If you have any information about a formula match for "Squirrel", please comment below. 
:-)

Tuesday, March 20, 2012

Tract home trauma, Part 1: Avoid kitchen cabinetry failure

In my last post, I described a Houston trend that drives me batty:  folks in otherwise-upscale subdivisions allowing their fences to look like crap. 

On the same theme, here's another local phenomenon I simply don't understand: folks failing to install hardware on their kitchen and bathroom cabinets, hardware otherwise known as cabinet pulls or knobs. 
These were about $4.00 apiece at a big-box hardware store.  I can't find a listing for this exact product right now and they may have been discontinued due to style changes, but these are somewhat similar.
It's usually up to home buyers to install this kind of hardware, especially if the home was a "spec" (built for speculative sale in the open market) rather than a "dirt sale" (contracted ahead of construction by a specific buyer).  Builders don't generally supply these things unless they are chosen by the buyer as an upgrade because they are so taste-specific, and once you've drilled a set of holes for them, you're married to that hardware for the duration of the cabinetry (which is one of the reasons why I chose knobs instead of handle pulls, because knobs only require a single hole per cabinet and can be easily changed out as styles evolve). 

These are not just for style or convenience - they are important for preserving both the structural integrity and the surface finish of your cabinetry.  Regardless of whether you have entry-level grade cabinets or upgraded cabinets, knobs perform two functions:

(1)  They minimize natural skin oils and food residues from coming into direct contact with the wood or paint finish of your cabinetry and degrading it.  When you open the cabinet, you should be touching knobs rather than the wood finish itself.  In just the course of a few years, oils can break down the cabinet stain around the touch points, making them look awful and shortening the life of the cabinet finish considerably.

(2) They help extend the life of the structure by minimizing lateral stresses on the joinery.  When knobs are not present, people tend to open drawers by grabbing the edges semi-randomly, often in an off-center manner such as this:
If you grab it like this, you're actually pulling sideways as well as straight out.  This has the potential to loosen the joinery over time, because if you pull sideways on a rectangular object, the forces serve to want to elongate that rectangle out-of-square.  If you've ever opened a cabinet drawer and notice that it's "wobbly", this is likely a contributing factor. 
The problem with this is that the structure was not designed to take that kind of sideways forcing.  If you look carefully at the way the drawers are constructed, you will see why:
The drawer facing (the pretty part that shows at the front) is typically connected to the body of the drawer using four heavy screws - two at each side.  HOWEVER...
...the body of the drawer itself is attached to the front portion using staples!  In this case, only three staples, and not very heavy ones at that. 
Let's take a closer look at this configuration:

Why kitchen cabinets are built like this, I do not know, but I've seen this type of construction in a wide variety of cabinets chosen by multiple builders in the greater Houston area.  Even "upgraded" cabinets may look like this.  "Upgraded" sometimes means that the manufacturer puts on a more fancy or elaborately-trimmed wooden cabinet face, but the structure of the cabinetry itself remains the same. 

I've been in Houston houses less than five years old where all the drawers in the kitchen are either loose, or the drawer fronts have totally fallen off.  Once those side staples start to loosen, it becomes difficult to restore the drawer through a repair process because those sides are usually made out of fiberboard, not wood.  Therefore, as the staples work their way loose, the fiberboard tends to crumble around them, making the whole thing very difficult to put back together again. 

If you install drawer knobs, you'll be pulling the drawer basically straight out every time you open it, rather than on a slight angle.  This can minimize the stresses on the side staples. 

Within about one week of moving into our Centerpointe house, I got busy installing knobs on everything in sight.  At the time, my husband questioned whether installing cabinet hardware was really a top priority, given that we had so much unpacking to complete.  AnswerYes.  I can't think of a faster way to reduce a home's value than to allow damage to occur to kitchen cabinets.  If you allow your drawers to weaken structurally, a future buyer is going to notice that and conclude that all that cabinetry is worn out and needs to be replaced, at a cost of many thousands of dollars.  Less than a hundred dollars worth of appropriate hardware can help extend the life of cabinets and minimize the chances of such a scenario arising.
To knob or not to knob...
there is no question.
These cabinets are now 2 years old and look as good as they did the day they were installed.

Saturday, March 17, 2012

Fence stain revisited

Did you read that the World's Ugliest Dog died of natural causes, namely old age?  It was national news the other day and, yes, in case you've been sleepwalking through the cultural component of your life for the past decade or two, there is a contest for the esteemed title of "world's ugliest dog". 

Houstonians are like any other geographically-defined group of people: they have their quirks, and the quirk that drives me the battiest is the one that makes people completely blind to the ugliness of their own fences.   All across Houston, people build impressive looking McMansions, a quarter million dollars and up, and then proceed to surround these suburban masterpieces with eight-hundred-dollar total-eyesore fences.  Why?!?  Can they not see that any good portrait is totally ruined if surrounded by garbage?

We can't have a World's Ugliest Fence contest in greater Houston because there would be so many spectacular entries that it would be impossible to declare a winner! 
:-)
In the "Structurally Intact But Degraded" competition category, who could possibly trump this?!
Centerpointe Drive about a quarter mile northeast of Calder.
It's been almost a year now since I published this post with before-and-after shots of our fence (and, by the way, the product we used, Olympic Waterproof Toner or whatever this year's name variant is, continues to look wonderful - no visible degradation or fading a year after application). 

But just in case you remained unconvinced by that initial post, I have another example to present here.  My in-laws are selling their house because of a job transfer.  After seeing their initial real estate listing on HAR, my husband and I decided to help them out by staining their fence the same way we did our own. 

Proof positive that any great art piece requires a FRAME.  The fence is the element that frames the property.  That's the initial real estate listing shot on the left, and our post-staining money shot on the right.  Neither photo has been digitally altered in terms of color saturation.  This is the same "Canyon Brown" stain shade as we used, but because their wood was a bit different in composition and age, this came out more cedar-toned than ours did.  Ours was a deeper brown shade.
There's simply no comparison.
Same yard, different angle, showing the job half done.
This fence was a uniform moldy grey color before pressure-washing.  With pressure-washing, it reverted to the blonder shade you see here.  This is lighter than most Houston builder-grade fences would become upon pressure washing, so this stain product would probably produce a deeper brown most of the time. 
Here in Centerpointe, we ended up with an unfortunate configuration in which an entire row of houses backs up to Centerpointe Drive, showing their rear ends, uh, I mean fences, to the world.  These days, civil engineers try to plat neighborhoods in such a way that all houses face the subdivision streets.  However, Centerpointe Drive is more of a thoroughfare than a subdivision street, and so we have this configuration: a solid mile of fences facing the road, fences that are only going to get worse-looking as time goes on.
The section of Centerpointe closest to Calder is the oldest, and its fences currently look the worst.
As I snapped the photo above, my husband asked me, "So who is responsible for maintaining that whole section of fence, anyway?  The POA or the individual homeowners?"

Danged good question and I don't know the answer to it (but when I find out, I will post below).  We all better hope that it's the POA because if there's anything uglier than a degraded cedar fence, it's a discontinuous degraded cedar fence where individual homeowners have all conducted section replacements at different times and in the inevitably-different styles that result from using multiple contractors. 

And the obvious question is... how much would it cost to clean and stain that mile of fences along Centerpointe? (And the fences line it on both sides, so it's actually two miles of fence).

I don't know.  I CAN tell you that the stain brand referenced above is about $0.80 per fence-foot retail price to apply, not figuring in labor for pressure-washing and labor for the stain application.  I also don't know how many years of extra life that kind of treatment adds to the fence, thus delaying replacement costs, and that's a very important question.  Those of us who paid to stain our own sections of interior yard fence have an interesting predicament: only one side of the fence is protected from water damage, mold and algae growth, and ultraviolet degradation from sunlight.  In our case, I essentially paid about two hundred bucks plus sweat equity to half-do a job.  If I knew how much lifespan the staining could add to the fence, I could tell you whether it's worth me spraying each of my neighbors' fence sides, just to make our shared asset last longer and potentially cost less over the longer term. 

Of course, that would leave those neighbors in the position of having to complete the rest of their own staining jobs, so you see what kind of a domino effect could result. 

I'm not sure what the best answers are here.  I only know that in our case, looking across our back yard to a moldy grey fence was not an option we were willing to accept. 
Would it be worth saving me from myself??

Thursday, March 15, 2012

Monarch moment, part 2

The natural result of this...
From a Centerpointe Communicator post of about a month ago.  Except I think I initially called the sex wrong on this one... upon closer inspection it appears to have been a female because it lacks the characteristic small black patch of pheromonal scales on the hind wings that males have
...surprisingly, turns out to be this:
Monarch caterpillars.  Lots of 'em.
Before departing our humble abode, one or more of last month's monarch visitors laid eggs.  This is one of the reasons why I like to have abundant landscaping in my yard: it's not just nice to look at in a passive sense - all kinds of interesting stuff happens out there.  It's an entire story unfolding on a daily basis in a ridiculously-small suburban back yard and, of one gets off one's duff and actively starts looking around, a lot of that unfolding story becomes evident, and there's plenty of learning opportunity in it.  I didn't know that monarchs actually bred and reproduced this far south.  I thought they proceeded farther north on their annual migrations before doing that. 

I seemed to have had far more caterpillars than milkweed available to feed them, because they stripped the plant bare.  That raised the obvious question: should I have culled the herd, leaving more milkweed available to a smaller number of individuals, or should I have let nature take its course??  Knowing very little about the life cycle of monarchs, I decided on the latter.
As the milkweed plants were getting stripped bare (they'll grow back from the roots), and the caterpillars began abandoning the urn of milkweed, presumably looking for more of it elsewhere.
"Is there any good way down from this thing?!?!"
This guy got one of the last available leaves.
And this guy decided to eat his last leaf upside down.
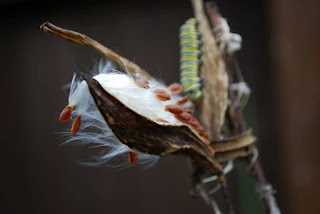
My milkweed recently went to seed, so I plan to harvest these and try to get more plants started, to be ready for next year's migration.  Monarchs are the only species of butterfly to engage in long-distance, round-trip migration, as many bird species do.  Except the monarch's lifespan is not long enough for any single individual to make the entire trip.  It takes three or four generations to complete the cycle.  They apparently use the earth's magnetic field and the sun to navigate in ways that nobody really understands, and the instinct to migrate is genetically-encoded
Notice how this guy had a larger yellow head and some larger sucker feet than the other individuals.  I don't know why this is.  Was he a different sub-species, did these differences represent the beginning stages of metamorphosis, or did this represent something else entirely? 
As of this morning, all of the caterpillars have vacated the now-stripped milkweed and have gone about their mysterious ways in doing whatever comes next for them.  I don't know if any of them got enough nutrition to make it through their chrysalis stage.  I was kinda hoping to see a few cocoons hanging around our yard because they're really neat...
www.wikipedia.org
They start out looking like this...
www.wikipedia.org
...and then toward the end of the metamorphosis, you start seeing the butterfly forming within.
So perhaps if I get lucky, I'll find a coccoon or two somewhere in our yard in the next week or two (how far can caterpillars travel from a host plant before they have to hunker down for their change of life??).  And within a few more months, hopefully I'll have more milkweed.