Wednesday, March 14, 2012

Monitored milestone

QUESTION:  What do the following locations have in common?
  • League City, TX
  • Houston, TX
  • Cordova, TN
  • Dallas, TX
  • Graham, NC
  • Kuala Lumpur, Malaysia
  • Spring, TX
  • Boynton Beach, FL
  • Ontario, Canada
  • Surrey, BC, Canada
  • Amarillo, TX
  • Mountain View, CA
  • Birmingham, AL
  • Edmond, OK
  • Atlanta, GA
  • Dartmouth, NS, Canada
  • Denver, CO
  • Salt Lake City, UT
  • Mesa, AZ
  • Alvin, TX
  • Arlington, TX
  • Overland Park, KS
  • Conroe, TX
  • Regina, SK, Canada
ANSWER:  They are all home to internet users who have accessed Centerpointe Communicator within the past four days.

(And if you think it's a bit creepy that I know that, bear in mind that every website you visit will, at the very least, track your path via invisible HTML code embedded on the sites.  I use a simple freeware called Statcounter that registers ISP and originating city, but no information about users' identities).

I note this merely because we exceeded the ten-thousandth pageload mark the other day. 
TJ is my favorite Prez.  Can you tell??
:-)
The fact that a micro-blog designed primarily to respond to a micro-neighborhood of about four hundred families gets that much traffic is a testament to, well, just how much overall traffic there is on the internet!! 

The fact is, most of that traffic comes from outside Centerpointe (a fact that at least one of our POA Board members would like to see change to become more neighborhood-inclusive), and there are many people out there in the wider world who are looking for information on good fence stains, new gardening ideas, local taxes, what snakes to watch out for in Galveston County, where live oak trees grow, what Centerpointe is like as a place to live, what to do when you have public utilities running through your back yard, how CCISD zones its public schools, and even (this is the user's exact search string) "what is being built at 1114 League City Parkway". 

Can you believe that Google's associative powers are now so refined that if someone types in a search string that reads "what is being built at the corner of West Walker and 96", it points directly to this Centerpointe Communicator post?  That searcher didn't even state the site address, or the city it was in, and they didn't even properly refer to "96" as a state highway!!

Anyway, sometimes I ask myself why in the heck I bother to sit here a couple of mornings a week and load up new posts, but Statcounter tends to give me that answer.  Readership within Centerpointe itself may be very limited, but a whole mess o' other folks are apparently getting some value out of this thing.  And that makes it worth doing.  I can't stress enough now much of a creative benefit the Internet has been in MY life.  It's nice to be able to give something back to the universe of people who have made the Internet what it is today.  Pay it forward!!
:-)

Thursday, March 8, 2012

Cinder block garden: design, build, and ant control

***UPDATED April 5, 2013 to include building instructions and also to discuss fire ant control strategies for cinder block gardens located in the southern United States.***

Those of you who (a) garden and (b) follow internet garden websites or DIY home improvement channels may know that "cinder block gardens" are one of the hottest residential landscape design trends right now. 

I could not resist jumping onto that particular bandwagon, although my resulting design is more elaborate than most of those that have come before.

A new innovative use for very old and very cheap materials.
Holy cow, this has been one of my longest-gestating projects ever.  It looks so simple - erect a bunch of cinder blocks to create a wall-like pocket garden for small cacti and succulents (or other types of plants if you prefer).  It turned out to require an unusual amount of planning and labor - but for a result that was well worth it, as the following sections will show.

My intention was to take the wonderful ideas initiated by numerous blog sites such as Apartment Therapy...
http://www.apartmenttherapy.com/la/gardening/modern-diy-outdoor-planter-093540 
 ...Pocketgrow...

http://pocketgrow.com/blog/hydroponic-how-tos/diy-cinder-block-focal-point-vertical-planter /
...and Moscato Mom...

http://moscatomom.com/diy-cinder-block-garden-phase-one-and-why-i-wish-i-had-paid-attention-in-geometry/
...and move this concept to the "next step".  This is THE neatest thing about the internet community:  someone gets an idea, produces it, and then others proceed to build upon it in new ways that everyone can ultimately benefit from. 

I started this project by testing new ways of designing it, specifically, by using Lego blocks to try various lay-outs, Legos being much easier to lift than cinder blocks!
This was one of my final designs in miniature, looking down at a representation of the yard corner where the cinder block creation was to be placed.
However, what I found in practice is that the Lego didn't give me as much "feel" for the project as I had hoped it would.

Here's where I started "dry fitting" the cinder blocks into the space per my Lego design.  Immediately it became apparent to me that the square central planter just did not look right in this space.  It was out of proportion to both the space and the cinder block "walls" that would flank it on both sides.
Incidentally, it also became apparent to me upon dry-fit that the back side of the stacked-stone neighborhood fence accent had to be neutralized.  Our yard backs to a public street, and our fence intersects one of these decorative units.  They look great when viewed from the public space because all you see from that direction is the stacked stone facing. But on our side, mostly what we see is the yucky peach-colored cinder block supporting structure. 

With this in mind, I obtained a fairly close paint match for the existing fence stain.  An exterior latex paint will work for this kind of thing. 

DESIGN HINT:  Good contemporary design often succeeds by balancing rugged elements with sophisticated elements.  A cinder block garden wall is going to be a rugged element.   Therefore, if you want to maximize the artistic impact, surround it with relatively sophisticated elements.  Paint or stain any fence backdrop in the field of view to add such sophistication.
So given the limitations of the Lego approach, I had to go back to the drawing board and actually dry fit the cinder blocks into the space, trying numerous configurations until I found one that was satisfying.

NEXT DESIGN HINT:
Once you decide upon your layout, make a sketch or take a photograph of it. I took photos and then printed them out so that I had a "go by" in front of me at all times while I was building.  
OK, now the step-by-step instructions:


My revised design ended up retaining the central planter, but had a zigzag pattern in it to soften the weight of it.   I left the dry-fit cinder blocks in place on the ground for a couple of weeks (could not build due to bad weather), and by the time I had started construction, the blocks had killed the grass underneath their footprint.  For this reason, it was extremely easy to excavate the sod once it came time to build.   The blocks left an easy trace to follow. 

Once I got the sod excavated, I used a sledgehammer to compact the earth underneath it.
Sand fill was added to the excavated areas as part of the leveling process.
This is a critical step:  I used 8" x 16" flat pavers to form the foundation of the structure, but they had to be set precisely level or else the entire structure would have been out of whack.  My engineer husband assisted with this part of the task.
Let me stress that again: They have to be absolutely level in every direction.  The  entire structure must sit within a flat plane. It's going to be extremely heavy, and if it is leaning in any direction, the gravitational forces are going to cause it to want to crack and/or topple over eventually.   That would be a safety hazard as well as spelling the ruination of the project.  
Let me stress it a third time:  Make it level. Here, my husband is using a sledgehammer to assist with compaction.  He's using that piece of 4x4 lumber to distribute the compaction forces evenly over the pavers.  If you simply try to pound the pavers directly with a hammer, they will split.

This foundation step could also be accomplished by pouring a level concrete footing.  But I am always hesitant to pour concrete because I never know which projects I will want to keep for the long-term and which are going to end up being do-overs.  
Once the foundation was completed,we started to add the bricks per the dry-fit design.  We used construction adhesive to hold the entire thing together.  As several previous bloggers noted, this produces a more contemporary seamless look than using mortar.

DO NOT seal the entire perimeters of the joints with construction adhesive.  You are going to want to leave some sides unsealed so that water can drain out of the structure.  
This is the adhesive that we used, obtained from Home Depot.  It seemed to be very strong and good for the job.


Prior to buttering with the adhesive, we used a wire brush to remove loose material from the bottoms of the cinder blocks... 
...and a nylon brush to remove dust.
We used pea gravel to fill some of the cinder block channels for added support. I don't think this is necessary, but we had extra pea gravel left over from a previous project, and so we used it like this.  

April 5, 2013:  Retrospectively, I would suggest that you NOT include this step.  See notes regarding ants in the final section of this post. 
We worked our way up the design, referring constantly to the previous photographs that we had taken of our "dry fit".   Depending on the complexity of your design, it might be worth taking photographs of each level as it is dry fit.  It can be  surprisingly tricky to replicate a dry fit from memory.
My design differed from some of the others on the Internet in part because I used capstones (8 x 16 pavers) throughout it.   It is important to note that you're not going to be able to achieve precise fits with this stuff -- cinderblocks were designed to be put together using mortar, not construction adhesive, and their size tolerances reflect that fact.   An 8 x 16 cinder block is not exactly the same size as an 8 x 16 paver (what we found is that the pavers were slightly larger than the blocks, as shown above).  You will need to tweak your design as you go along in order to make everything fit together in a visually pleasing way.   
Once we got the structure assembled, it was time to line the bottom of the cinder block planter holes so that the potting soil would be retained within them.  There  are a couple of different ways to do this.  Some previous posters used broken sections of pavers and wedged / glued them into place.  That struck me as a lot of work, and very heavy besides.   Blogger Sunny used cavity caps, but we found two problems with that idea:  (1) The do not seem to be available anywhere in the southern United States at this time (I did the research), and therefore if they are used, they have to be ordered out of suppliers in the eastern United States   (2) Although they are galvanized, I was worrying about the rusting potential because, again, they are designed to be used in the conventional manner with mortar, which would largely seal them from the environment.  The last thing I want to eventually have is a bunch of rust streaks down the sides of my cinderblocks.   For these reasons, I decided to try less massive hardware cloth that I could line with plastic.   It still could rust, but there's less of it. 
The adhesive that we used seemed to be really strong, and so this is how we attached the pieces of hardware cloth into the bottoms of the cinderblock cavities.    
This is maybe overkill, but I also cut strips of plastic to use as liners inside each of the cinderblock cavities. I also added a bit of pea gravel to the bottom of each, the way you would add it for drainage to a regular flowerpot.      
The large central planter bed was easy to fill with soil, because I mostly re-used the soil that I had excavated for the foundation pavers. That excavated soil consisted largely of the sand fill that had underlain the grass sod, so it was perfect for cacti and succulents.    
Before adding that soil fill, I used plastic to line the bottom part of the planter bed.  Again, this may be overkill, but I was worried about water leaching out through the sides, because cinderblocks are so porous.  I did not want water leaching out and making mineral stains as it did.       
I also added landscape fabric to the bottom, to discourage weeds. 
On top of the landscape fabric, I added a layer of pea gravel for drainage. This is also a good place to get rid of your scraps of broken stone and pavers. 
Soil mix for planting cacti and succulents:  Several websites recommend a mixture of sand, potting soil, and peat moss in equal proportions, so I did that.    
I blended these components together in a wheelbarrow. 

Note that, while individual cinderblock cavities are not large, I had eighteen of them in this design. Cumulatively, they consumed an entire wheelbarrow of mixed soil.   
I also blended cactus soil for the final top layer of the central planting bed.
I had been collecting cacti and succulents throughout the winter from a variety of big box stores. Usually during the winter months, they go on sale for very low prices.   
OUCH!  The moment of truth as each specimen was planted in its respective block cavity.

DESIGN TIP:  I structured the central front planter with capstones (pavers) so that it could also be used as a bench, and it does work very well as a sitting area for two.  I was very careful to plant the spiny cacti in areas AWAY from the bench, and to use the softer succulents in the block cavities nearest to the bench, so that visitors would not accidentally brush up against any spines!!
Let's see the final result from one more angle:
And voila - the final product!
Note how the dark fence sets this off nicely.  If the fence behind it had been shabby, it would not have looked as sophisticated, for lack of design balance. 

Note also that I used capstone pavers for more than just the foundation and the front bench - there are several lines of them inserted into the structure itself.  These break up the "holey-ness" of the cinder blocks and provide ledges upon which to put drinks, for instance (such as that well-deserved pot of green tea to photo right).

Incorporating cinder block singletons (8x8 blocks rather than all 8x16 blocks) also breaks up the monotony and adds interest.

Materials and approximate DIY cost* of this project:
  • 8 x 16 cinderblocks:  approx. 50 blocks @ $1.46/block = $73.00
  • 8 x 8 cinderblocks:  approx. 10 blocks @ $1.08/block = $10.80
  • 8 x 16 pavers:  approx. 25 pavers @ $1.31/paver = $32.75
  • Construction adhesive: 6 tubes at $7.50/tube = $45.00
  • Peat moss (only about 15% of the bag was used): 1 bag @ $9/bag = $9.00
  • Potting soil: 1 bag @ $7/bag = $7.00
  • Construction sand: 6 bags @ $3.50/bag = $21.00
  • Cacti and succulents:  23 plants @ average approx. $2.50/plant =  $57.50
TOTAL:  approx. $256.00

(* Approx. retail prices in Houston Texas in February 2012.  Note that the block counts I did above are rough counts made after the structure was completed.)

Thanks for viewing!!  If I have any follow-up comments or hindsight lessons, I'll amend the post in the section below this line. 

ADDED APRIL 5, 2013:

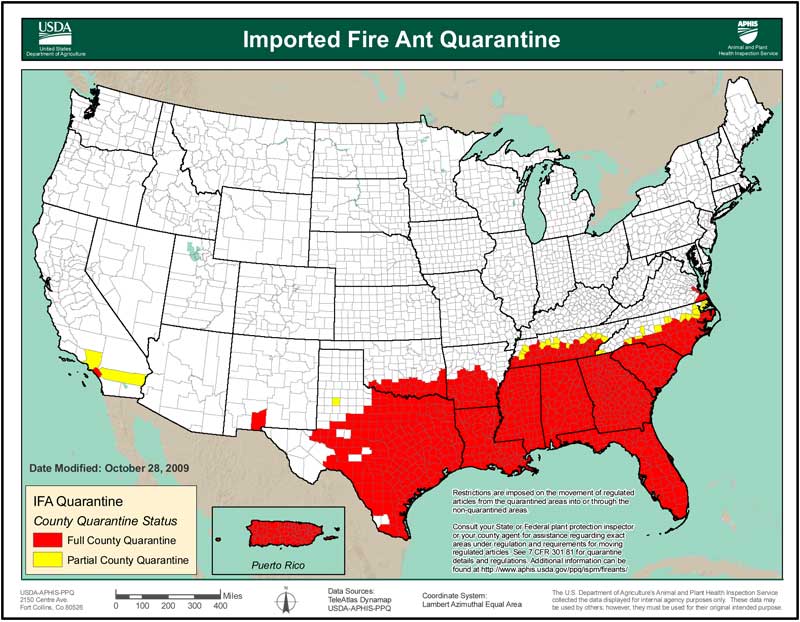
No new design proves to be 100% perfect from the outset, and this garden is no exception.  Structurally and horticulturally, it has performed better than expected - but I'm in greater Houston, and we have to live with an intense outdoor menace in our area:  invasive South American fire ants. 
They are a scourge upon these United States. 
Screengrabbed from this TPWD site. 
And, oh my word, the misery they have caused me here.  Retrospectively, I should have constructed this cinder block garden with some potent fire ant poison already embedded within it.  To date, I have used no chemical pesticides anywhere near my food-growing places, but I may have to make an exception for this cactus garden because my organic pest control methods are very labor-intensive and have only been semi-effective to date.
For the past several years, I have successfully used neem oil to keep fire ants out of my vegetable stock tanks.  Neem oil does not kill fire ants, but it interferes with their sense of smell, so they cannot tolerate it.  It drives them away very efficiently. 

However, stock tank gardens are very open and accessible and easy to treat.  In contrast, the cinder block cavities create closed environments where it's very difficult to reach the ants...
...especially in those portions of the garden which are covered by capstones.  Open cavity columns can simply be treated by pouring a diluted neem oil solution from above and letting it percolate all the way to the bottom.  But where capped, I had to retrofit those columns with tiny holes drilled using a masonry bit.

Do you see the tiny circular hole to the left of the shadow? 

This is me squirting the diluted neem oil solution into that hole using an old dish detergent bottle that I washed out for this purpose. 
I also have to do the same thing between the gaps in the cinder blocks, because the fire ants will seize ANY untreated area as a nesting foot-hold, no matter how small. 
 
The neem oil works, but it has to be re-applied very frequently (whereas I find that I can treat a vegetable stock tank and thus be done with ants for months to a year at a time).  And, as I noted in this other post, neem oil is very expensive.  I may bite the bullet and inject the cinder cavities with a conventional chemical pesticide in order to win this particular war, because I have no plans to ever grow anything edible in this cactus garden. 

Aside from the misery that the ants have caused me, watching this garden grow has been wonderful.  This post shows some of the blooming results from spring 2013.
Into every southern suburban life, a few ant problems must fall.  But incredible beauty also falls. 
  

Saturday, March 3, 2012

It's in the bag

Bags are a recurring theme in this week's news.  On the local front, there were two incidences involving theft of handbags, aka "purse-snatching": one on March 1 in the shopping complex near IH-45 and FM 646, and one on March 3 a short distance north of Centerpointe on Main Street. 

I wish that news stories like these would provide more detail as to what may have triggered the specific crimes that occurred. 

The first woman was robbed at approximately 1:00 a.m.  Clearly, if you wish to increase your chances of being robbed, walk across any 24-hour Walmart parking lot after midnight (or any other commercial parking lot, for that matter). 

But the second woman was robbed on a weekday right around five o'clock rush hour in the absolute center of League City, near the corner of Highway 3 and FM 518.  It doesn't get any more publicly visible than that.  Was this totally random, or was there something specific about the circumstances that led to that particular woman being targeted? 

From the reporting as given, we'll never know, and these things are worth knowing.  For example, did that woman appear unusually wealthy?  Was she carrying the type of handbag that looked particularly expensive and therefore might contain a lot of cash or credit cards?  Or was it a type (perhaps flimsy) that looked particularly easy to snatch? 

American women tend to use handbags as fashion statements, whereas women in many other countries stick to a more utilitarian groove.  WikiHow has an entry on preventing purse-snatching, but it doesn't really deal with that distinction. 

Myself, I use a "cross-body bag", not to be confused with a "body bag".  It's extremely difficult to buy a good utilitarian cross-body bag in America, as most of the ones I've found have been fashion-driven knock-offs of what women more often carry overseas. 

This website claims that cross-body bags make women less vulnerable to purse-snatching.  There may be some truth to that simply because a thief, looking at a woman whose purse is essentially wrapped around her body instead of carried in the hand or over the shoulder, may decide that it would be too much work to remove it (i.e., other women would be easier targets).  Of course, a thief could cut the strap in order to circumvent this difficulty (my bag has a stainless steel cable running inside the strap to prevent that kind of thing). 

Simply standing out from the crowd may also help, and women who wear utilitarian cross-body bags definitely don't fit the American mold.  The key to avoiding crime is to make yourself appear atypical in a way that defies quick assessment and suggests relative strength.  If a criminal cannot fit you into a preconceived stereotype that is immediately understandable in terms of its vulnerabilities, you are more likely to be passed over as a target.

Which brings us around to this week's second entry in the bag-related theme:  shopping bags.  The City of Austin has just passed one of the most comprehensive shopping bag laws in the nation.  All plastic and paper bags will be banned at check-out counters starting in March of 2013.  We can expect that precedents like this will eventually spread into other areas as well. 

This type of restriction sounds like a PITA, but it's really not.  I began carrying re-usable shopping bags several years ago not because I was suffering from greenie guilt, but because they are simply more convenient.  The problem with disposable bags is that they have gotten smaller and smaller over the years as retailers have had to contend with lawsuits alleging that people got injured because they tried to lift a retailer's bag that was too heavy and therefore it caused them to throw their back out or otherwise get injured (although such lawsuits are not always successful).  What's a true PITA is having to wrangle fifteen microscopic grocery bags when the contents would instead fit into two regular tote bags, which would then be easily manageble, one in each hand.

And of course, both of my hands are always free because I'm wearing a cross-body bag as my purse.  So if you want to look like an unlikely bag-snatching prospect, wear a cross-body bag and carry your groceries in a couple of canvas tote bags. 

Of course, my teenage daughter doesn't label this configuration as "unlikely bag-snatching prospect".  She just calls it "nerdy".
:-)

Friday, March 2, 2012

Live and let live oak

Are your front-yard trees looking a little sick at this point?  You might want to read this short post before taking the pruning shears or loppers to them.  This morning as I was driving my child to one-of-the-last-of-the-original WAVE buses, I noticed a resident sawing into one of their trees, and I'm not sure that this was necessary.

Almost all of the front-yard trees we have in Centerpointe are the live oaks, which were originally planted by both of the neighborhood builders (Brighton and Meritage). 

I'm not certain of the exact live oak species we have here (there are many), but if I look up live oak on the website of the big-box retailer Lowes hardware for instance, it tells me that what they carry is the species Quercus Virginiana.  This is probably typical of other local suppliers.

Q. Virginiana is a quasi-evergreen tree that looks like it ought to be a deciduous tree, because it has the shape and size of leaf that one expects to see falling off once per year. But this tree has a peculiar habit: when it decides to defoliate (shed its leaves), which is not every year, it does so in the spring, rather than the fall or winter as typical deciduous trees do.
Here's a close-up of one of mine this morning.
Looks pretty pathetic, eh? 
Brown, and then they fall off en masse until the tree looks like a scraggly hot mess.
To complicate matters, it can be very difficult to determine whether a browning live oak branch is a dying branch or simply a normal spring-defoliating branch.
Here is that same brown-leaf branch broken open.  It's not overwhelmingly green anywhere, is it?  You have to look very carefully at the layer immediately underneath the outermost bark to see any green-ness at all.  Furthermore, with live oaks, even a healthy branch will appear fairly brittle like this.  It won't be all green and easily flexible like other trees.
For even more complication, here is a distribution map for this tree species:
Copyleft;
from http://en.wikipedia.org/wiki/File:Quercus_virginiana_map.png
It immediately becomes apparent from this map that this tree, as common as it is in Houston subdivisions, actually has a very restricted distribution.  For this reason, if a homeowner is not from the deep south, or hasn't lived in the deep south for some time, they may not be familiar with the quirky behavior of live oaks.  And therefore that resident may mistake a naturally-defoliating spring tree for a dying or dead tree that needs to be cut down.

Moral of the story: What you see today with your live oaks is not necessarily what you're going to see a month from now when they have bounced back from their current leaf-shed.  Check before chopping.
Looking rather crummy at this point, but not to worry.  This tree is actually healthy.

Thursday, March 1, 2012

No such thing as an ordinary moment

So I stepped out of my front door yesterday afternoon to run a quick errand, and came face to face with this:
The new Arlington River?
My first thought was, "Who busted the water main?!" but it turns out that League City was apparently testing a nearby hydrant.  Testing, or flushing, or whatever it is that they do.  Sure enough, when I Googled it, I did find reference to a civic alert issued a few months ago.  They must still be continuing with these tests.

So then about fifteen minutes later as I was driving back into the neighborhood via Centerpointe Drive, I saw what I have long suspected was occurring: a hawk was actively dive-bombing my back yard.
This fellow or someone of similar size and species.  This pic is reproduced from a previous post describing why these guys are very common inside Centerpointe. 
 So I exit my suburban dream home, and within fifteen minutes, a hawk is trying to take over the place.  That kind of puts things in perspective. 

If I'd had a chihuahua out there, it would have been hawk-toast.  But I don't have a chihuahua.  I suspect this hawk is intent on eating the mourning dove who is nesting in one of my hanging plants.  I posted about hanging-plant-nesters last year, but last year's dove either abandoned her nest or was killed before her eggs hatched.  So far, this year's dove is sticking to task:
If you look at the tip of the arrow, you can see a blurry black eyeball peering out as she is hunkered down in the plant basket.  I can't get a better pic than this because it would scare her off the nest.
 I took this pic this morning, so she survived yesterday's kill attempt, obviously. 

These things, in the space of fifteen minutes, on the routine quick drive to pick up a child from school.  There's always something interesting to see, even in narrow intervals of time, even in "ordinary" suburbia.  

Thursday, February 23, 2012

Mosquitoes versus our ponds

Mosquitoes are rapidly becoming intolerable again in north Galveston County, and there will likely be the usual debate as to whether they are primarily attributable to all the rain that has created standing water in local areas, or tidal impacts to saltwater marshes.

Our last significant outbreak occurred in October 2011, when Galveston County Mosquito Control (note that their URL contains an annoying buzz that you may not want resonating throughout your cube farm, if you work in one) made a PR blunder in stating that they weren't actually that bad.  In fact, they were horrible, and the ensuing recant described why. 

October's outbreak was exacerbated by the earlier effects of Tropical Storm Lee, which caused higher-than-normal tides to flood saltwater marshes, prompting mosquitoes to hatch out.   (If you remember, T.S. Lee was probably THE most expensive and devastating tropical system that Texas never had, because the winds fueled the wildfires that wiped out parts of Austin suburbia and, of course, Bastrop.)

At this point, I don't know if this latest batch of mosquitoes is primarily the result of local rainfall saturation, or salt-marsh hatch-outs.  But while basking in the outdoor air yesterday, I did receive an interesting question from a Centerpointe resident, the inquiry being punctuated by repeated slaps at arms and legs: Why isn't the retention pond behind the apartment complex (Walker Commons)  drained just as our neighborhood's own stormwater retention ponds are? 

Centerpointe's dry-bottom ponds will retain some water immediately after heavy rains, but then they go dry again, presumably minimizing the number of mosquitoes that are able to hatch out of them.  But that large pond behind the apartments is permanent - it's full of water all the time. 
Google street view looking north from League City Parkway.
This is a darned good question, and the answer is as follows: That is NOT a stormwater retention pond.  That's an old flooded sand pit (these things are also called borrow pits). 

At some point between 1943 and 1955, sandy fill was excavated from that area, almost certainly for construction purposes.  In order to illustrate the history of that pond's development, it's most useful to work backwards in time from our present-day familiar reference point:
Topographic map last updated in 2010.  You can see the distinctive pattern of Centerpointe's streets near the words "League City", and the pond toward lower right.
Same area in 1995, pond still visible.  Centerpointe's construction would not start for approximately another five years.
Same area in 1955, with the pond appearing as purple stipple, indicating that it is a new feature added since the previous map, which is shown below.  IH-45 / Hwy 75 is referred to on the map as a "freeway" for the first time.
Approximately the same area in 1943.  No pond was present at that time.  IH-45 was referred to only by its original name, which was Highway 75, indicating that it was not a "freeway" at that time.

All map grabs courtesy of www.usgs.gov.
Given that pond's location and its age, it was almost certainly used to supply fill for the original construction of the Gulf Freeway.  That history is strongly reflected in the topographic map series shown above.
And if you REALLY want some ancient history on this area, you can look at the 1929 topographic map that is available on line.  At that time, the only way to Galveston was via the original public right-of-way, what we now call "Old Galveston Road" - aka Highway 3.
You can see similar borrow pits (or "sand pits") all around greater Houston.  It costs a lot of money to transport the enormous amounts of dirt fill needed for freeway construction.  Therefore, TxDOT tends to acquire that material as close to the construction area as possible.  In some cases, the old sand pits have been used to enhance property development (e.g., the apartment complexes around the Windmill Lakes up by Almeda Road; Mammoth Lake Scuba Park about 50 miles from here in Clute is an example of an old sand pit permanently filled with groundwater and put to a productive commercial use).

That being said, this League City Parkway pond is a bit unusual in the degree to which it is fortified with fencing, signage, gates, etc.  Part of that is undoubtedly for liability reasons, as unauthorized and unsupervised use of these ponds sometimes leads to drownings, such as this one from last year.  But there's potentially another reason why security at that pond is relatively tight:  word on the street says that the pond's owners keep it stocked with some really awesome fish.  They don't want trespass leading to accidental drownings, but they also don't want people to steal their fish.  But that's just a rumor I heard on the street.
:-)

That news article cited above makes note of the fact that these pits can be up to sixty feet deep!! Hence the inability to drain them: even if they could be pumped dry, they're usually so deep that they would simply fill back up with groundwater again. 

Despite the inability to drain that pond, if you contemplate the sum total of information above, you'll realize that it is not likely a primary source of Centerpointe's mosquitoes because:
  • A healthy stock of fish will keep mosquito larvae under control, and
  • If it were a big mosquito-producer, we would experience heavy mosquitoes here in Centerpointe more-or-less continually, and we clearly do not. 
What DOES tend to influence our neighborhood mosquito misery is how often the nearby fields are mowed.  High grass does not produce new mosquitoes, but it gives abundant shelter to the mosquitoes that migrate out of the coastal salt marshes and into our area.  A good mowing of the fields east of Centerpointe often yields an immediate reduction in mosquito numbers here.  So if you have an urge to complain about the little buggers, you can do two things:
  1. Contact Galveston County Mosquito Control at 800-842-5622 to request a spraying, and
  2. Call the realtors posted on the "For Sale" signs in that field and request that the property owner have the weeds be mowed down.