Saturday, March 9, 2013

Better preparation for a bitter pill

About two weeks ago, TIME magazine published a seminal article titled "Bitter Pill:  Why Medical Bills Are Killing Us", which was authored by Steven Brill.   
Low-res screengrab from this site
Plenty of recent commentaries have described the state of America's medical system, but this one is different because the author successfully avoided the pitfall that dooms most such digests: a resigned ambivalence regarding the status quo.  Most commentators acknowledge that the current systems sucks, but that doesn't stop them from drinking the benzo-laced Koolaid and concluding that our collective situation represents a necessary evil that we all just have to shut up and live with.  This unimaginitive conclusion effectively nullifies any valid criticism those authors may have generated in their initial analyses. 

Brill does it differently, by focusing on the numbers rather than on the philosophy behind those numbers, and by asking the obvious resultant question: why aren't the market efficiencies of supply and demand working normally in this economic sector?  Let's not get mired in the bottomless pit of debate about whether American medicine should be a for-profit industry - let's just accept that it is (even when it is ostensibly termed "non-profit"), and evaluate the results accordingly. 

What falls out of the resulting analysis is nothing short of shocking.  It was so unsettling that I was only comfortable reading Brill's eleven-page article in small bites.  This was my pattern:
  1. Read the first two pages.
  2. Set the article down and go for a 2.5 mile jog around Centerpointe.
  3. The following day, read the next two pages.
  4. Set the article down and go for a one-hour yoga class.
  5. The following day, read the next two pages.
  6. Set the article down and cook a large quantity of a healthy one-pot beans and rice dish for my family (recipe to follow).
  7. The following day, read the next two pages.
  8. Set the article down and begin writing a blog post about it. 
Rather than focusing on the absolute nightmare that Brill's research describes or on the far-reaching implications for all of us (including for everyone who does have health insurance), I thought I'd focus a couple of posts on my responses to that absolute nightmare. 

In other words, why dwell on steps 1, 3, 5, and 7 which I can't do anything about, when instead I could use step 8 to talk about steps 2, 4, and 6 which are all under my direct control? 
  • The best way to cope with any unfair burden that life thrusts upon you is to simply side-step that burden. 
  • The best way to cope with America's failing medical system is to side-step the system by minimizing the extent to which you need to avail yourself of that system.
  • The best way to minimize your use of the American medical system is to remain maximally healthy.
  • The best way for most people to remain maximally healthy is by engaging in a lifestyle that helps to prevent disease by optimizing health, a lifestyle of which diet and exercise are enormous components.
Short version:  If you want the recipe for the tasty beans and rice dish I mentioned above, you have to slog through all this preachy preamble. 
:-)

When life hands you lemons in the form of a medical system that destroys the financial lives of many of the same people whose physical lives it paradoxically saves, make lemonade.  Make a really rich and healthy beans and rice dish that you can store in your freezer without significant loss of quality.  It might not sound like much of a push-back, but generally in life, we just have to do the best we can.  If we focus on doing our best, many problems will either resolve themselves or they will fail to manifest in the first place. 

So here's the recipe and yes, I intentionally chose a bright and colorful dish to counterbalance the gloomy truth that TIME magazine documented so thoroughly.  And this'll be fun because I bet you've never seen a beans and rice dish cooked in a wok before. 
I need to be efficient when I cook, so I make dishes in huge amounts and then engage in that highly-underrated American art form - freezing.  Assemble about this much celery, red pepper, oregano (fresh pictured here but dried also works), and onions (I used both green and bulb because both were available, but I usually use just bulb onions).

In this case, the green onion and celery are from Froberg's Farm in Alvin because I buy locally whenever possible.   
Chop everything and add to a large cooking pot.  Saute the mixture in olive oil.  Be generous with the olive oil - it's the only fat component in this dish and it's necessary for transmission of the herb and spice flavors.  I use at least one quarter cup, maybe more. 

Do you see how this is a huge fraction of vegetables?  This is a white rice dish and I need to minimize the overall glycemic index in my eating plan.  I achieve that in this dish by rigging very high fractions of vegetables and beans. 

Cookware note:  I have experimented with every available mega-pot over the past two decades, and my favorite is a 14-inch flat-bottomed wok.  They are extremely rare in the consumer marketplace (most are 12 inches which is not large enough for batch cooking).  Even rarer are the ones that have one straight handle, as this one does.  This is a 4-year-old Anolon which doesn't currently appear in my internet searches, so it may not be available any longer.  If I were going to buy a new one today, I'd probably choose this Circulon (but as of today, it was listed as out of stock until June 2013 - do you see how rare this item is??). 

Note how my Anolon has a good width across the bottom.  Many flat-bottomed woks have very little bottom surface area, which means they don't work as well on a consumer-grade cooktop (conventional woks are round on the bottom and set in ring stands). 

Actually, if I had my choice, I'd prefer a 16-inch flat-bottomed wok, but trying to get one of those is like searching for the Holy Grail.  I've never found one. 
After sauteeing, add about 2 tablespoons of each of the following:
Ground turmeric
Oregano (chopped fresh or dried)
Spice Lady's steak seasoning.

Turmeric has powerful anti-inflammatory properties and is believed to contribute to the prevention of disease

As for Spice Lady...

...you may be wondering why I'd include "steak seasoning" in a beans and rice dish.  I do it because this is such a well-balanced spice blend that I put it in many different things.

Spice Lady doesn't seem to have a web presence right now, but here's some contact information in case you'd like to avail yourself of her wonderful products:  She's occasionally at the Clear Lake Shores Farmers Market (check the Facebook page or get on their email blast list so you'll know which dates she's there).  The internet also lists an address of 609 Bradford Avenue #104, Kemah Texas and phone 832-563-6908. 
After you've stirred in the turmeric, oregano, and steak seasoning, you need to add four cups of broth plus two cups of water to the pot.  You can make this dish as either vegetarian or non-vegetarian, depending on your broth choice.  I usually use chicken broth. 
Salting this dish is difficult because the broths usually come with some salt already in them and it can vary from brand to brand.  I start with about a tablespoon added to the water at this point so that it will disperse well, and then maybe add a bit more later if it needs it. 
Action shot #1:   Add three cups of uncooked rice.

Now you see why I need such a large cooking pot.  I'm making a ton of this stuff at one time. 

I used Texmati rice, grown right down the road in Alvin Texas (locavores rejoice!!).  It's very expensive compared to many other brands, but every time I substitute another product, I'm not happy with the way this dish turns out.  Give me Texmati or give me death (of taste buds). 
Immediately after adding the rice, cover and simmer.  Do not remove the cover or stir until the rice is at least 75% of the way toward being totally cooked.  It'll take about twenty minutes. 

Cookware note:  Most 14-inch woks are not sold with their own covers.  I bought this one for one dollar twenty years ago at a yard sale. 
The main skill in getting to this part is in carefully stirring that rice so that the top portions get exchanged with the bottom without being made mushy by stirring.  The upper layers stay cooler due to the massive size of this pot - the top is much farther from the flame. This is where having a wok (as opposed to a straight-walled pot) comes in handy.  With a wok's sloping sides, I find that I can gently "fold" the sides of the rice into the center and stir it that way without mashing it.  The horizontal distribution of the food also means that the rice doesn't weigh too heavily on its own self while cooking. 

Once the rice is 90% cooked, I add beans, either all black if I want a more earthy-tasting dish, or part black, part pinto if I want a more refined dish (pinto has a milder taste).  In this case, I added those four cans of black beans and none of the pinto.  Sometimes I do half and half. 

I have tried for years to find an organic bean of optimal quality, but I haven't found one that suits me.  Bush's beans are simply the best on the market, in my opinion.  And I've tried every other product, like, for the past twenty years.  I'm not a big fan of large-scale modern agriculture, but I can't find an acceptable alternative here. 
Action shot #2:  Rinse the broth off the beans so that it will not dull the colors of the dish.  Part of this dish's appeal is its natural bright colors. 
Action shot #3:  Add the beans and again, "fold" them into the mixture gently.  Don't squish the rice.  Then allow it to heat gently, cover removed, for about fifteen more minutes.  That will allow all the tastes to blend. 

And again, note the ratio of the ingredients visible here: a LOT of vegetables and a LOT of beans so that the higher glycemic index of the rice is balanced out. 
And there she is!!!

As a final step, I sometimes add just a pinch of ground chipotle pepper.  Just a pinch, though, because too much will start overwhelming the turmeric and oregano. 
Here you can see nine Pyrex storage dishes (photo right) filled with the beans and rice and stacked in our massive freezer.  I use what Pyrex describes as their "basic glass" line of storage dishes.  I need them to stack neatly and so I don't want any air release buttons or other frou-frou on the lids. 

Because we freeze such massive quantities of food, we actually own somewhere between 50 and 100 of these Pyrex dishes (update note:  I went back and counted, and we have ninety-three Pyrex dishes, mostly in the range of 2 to 6 cup storage capacity).  I've accumulated them gradually over the past ten years.   They need to move efficiently between freezer and microwave and conventional oven and table without me messing with inter-container transfers, so they have to be high-quality tempered glass.   
Many Americans experience a brain freeze when presented with the idea of freezing their food. They associate the process of freezing with cheap "TV dinners" and assume that freezing will seriously reduce food quality.

 To be sure, some dishes do not freeze well - but many do, including this beans and rice recipe. To the left of it in this photo above, you can see three Pyrexes of a mint quinoa/garbanzo bean dish, and spaghetti sauce at the far left. All of these recipes go through a freeze-thaw cycle without significant loss of taste, texture, or quality.  The secret is to make them with the highest-quality ingredients to start with.

This is the main strategy by which we carefully control our eating plans in my home. My husband and I both have jobs. We can't come home and prepare fresh meals every evening - we have neither the time nor the energy for that.   Instead, on weekends, I make massive quantities of our favorite dishes and freeze them like this so that they can be taken out and microwaved in a matter of minutes on work days. It's much healthier and a much more efficient use of my time than any of the other approaches I've tried over the years. And much tastier, too. 

So there's an example of my first push-back against the bitter pill of a broken medical system.  Ultimately, none of us know whether we'll succumb to that system, but by developing healthy counter-strategies such as this one, at least I'll be able to know that I tried my best to avoid such a scenario. 

Friday, March 8, 2013

Laundry room lighting ideas

Tag line: Blasted ballasts.  (I didn't want to use that phrase to name this post because folks searching for laundry room lighting ideas might not find it.)

It's definitely our year to upgrade light fixtures.  First the dining room, then a child's bedroom, and now the laundry room.  This past weekend, as I was getting the household chores underway, I flipped on the laundry light switch only to hear a loud "BZZZ..ZZZ..ZZTTT". 
 
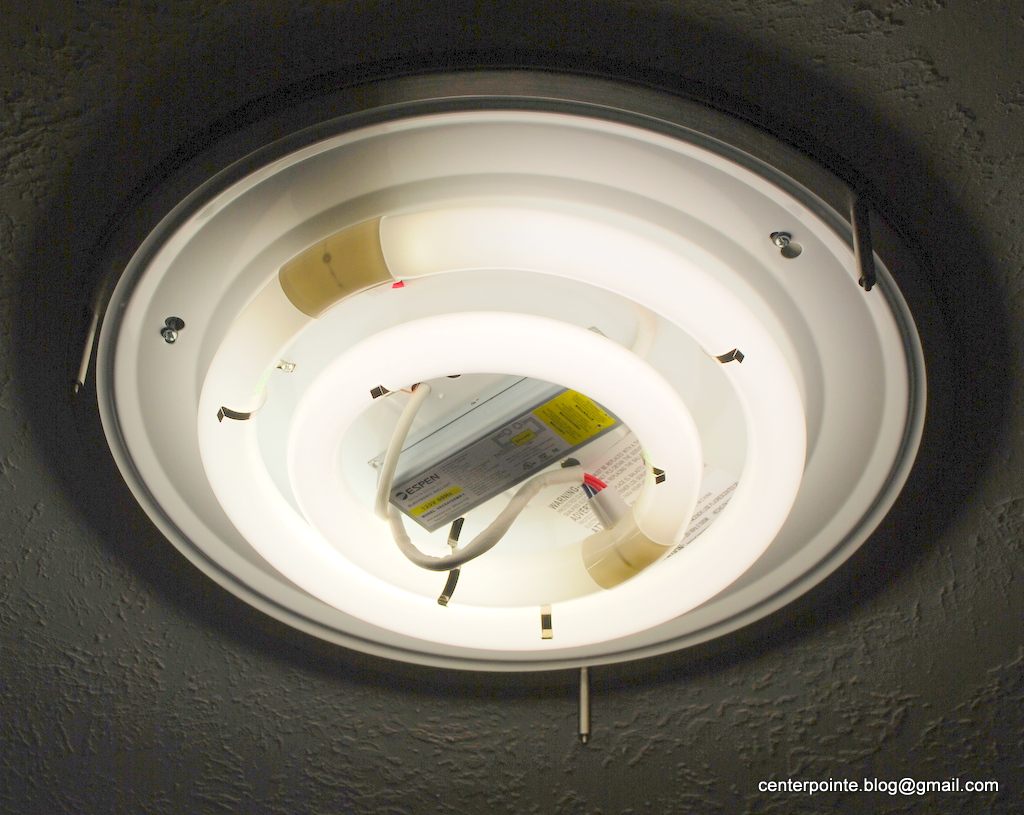
This electrical ballast had blown.  Basically, the guts inside this device had shorted out. 
As is usually the case at our home's relatively low price point, our builder delivered a standard unglamorous tube fluorescent fixture in the laundry room ceiling.
Here is the fixture shown with the cover taken off and the two tube lights removed.  These fixtures are only about $22 to buy retail (here's a roughly comparable example).  It looks shiny and new, doesn't it? That's because it was barely three years old when this failure occurred. 
Here's the kicker regarding this type of fluorescent unit:  the fixture costs about $22, but common 2-light ballasts cost about $16 (example here).  So once the fixture's original ballast dies, it's arguably a write-off. 

That being the case, I was inclined to replace this whole fixture, rather than just its ballast.  In my opinion, there's nothing like a cheap four-foot fluorescent to turn a home into a machine shop, appearance-wise.  In my opinion, these things are so ugly that they're downright depressing.

The question then became, replace it with what??  We don't have sufficient space for most other lighting options.  By Houston suburban standards, our home is intentionally* close to being a "starter" floor plan model (see our cost allocation strategy here).  As such, we don't have a laundry "room" per se.  We have a five by nine foot void space connecting the kitchen to the garage.
* Quality over quantity: I'm glad we decided to choose a smaller house, but it does require extra thinking on issues such as this. 

Screengrab from a recent Culture Map Houston article titled "Hottest New Home Trends". 
It requires extra thinking because we have shoe-horned the following assets into those forty-five square feet of space which must also serve as a hallway to the garage:
  • A full-size front-loading washer and dryer
  • A 22-cubic foot upright freezer
  • Six linear feet of clothes hanging racks
  • Fifteen linear feet of open shelving which extends all the way up to the ceiling
  • Our second microwave oven (more on the double microwave concept in a future post). 
In order to maintain shelf clearance in such a small footprint, we simply can't have a large light fixture in that space. 
As I was crawling the web looking for laundry room lighting ideas, I came across this amusing entry by the DIY/lifestyle bloggers known as The House of Smiths.  Their laundry room appears exactly the same size as ours, and they addressed their clearance issues by swagging their chosen fixture very close to the ceiling.

Their chosen fixture, of course, is the very same fixture we chose a few weeks ago for our daughter's room.  But because of our shelving configuration, this would not work in our laundry room. 

Screengrab courtesy of The House of Smiths.
In particular, our fixture had to be as shallow as possible.  Not only do we need clearance to access the top shelves, we're constantly dragging ladders and other equipment in from the garage.  Any dangling or deep fixture would end up getting smashed.

After an exhaustive search of both low-end and high-end choices, this is the fixture upon which we settled:
A Hampton Bay flush-mount fluorescent.  I don't think it's available at Lowes, but I got it off the shelf at the League City Home Depot. 
As of March 2013, the on-line reviews at this Home Depot website were pretty grim.
Uh-oh.  Great price, but less than three stars.  Why??
Uh-oh.

Collage of review screengrabs courtesy of Home Depot
So basically what I'm saying here is that I, a savvy DIY-er, chose to replace a light fixture with obvious ballast problems with yet another light that appears to have ballast problems.  Why?? 
Because of this:  Save your box, save your receipt, so that you can claim it if the ballast fails.

It is possible the ballast issues are occurring industry-wide right now.  If that's the case, it makes sense to me to buy cheap.  That way, I get the same amount of hassle but at a lower price. 
:-)
This is the same decision tree I used to select a microwave oven after our builder-installed oven failed twice within its first 24 months:  When everything on the market appears to suck and it doesn't seem possible to side-step the problem by buying up, it then makes sense to go for the best warranty at the lowest achievable cost. 

But there's also another key reason why I chose this fixture.

As I mentioned in this post, good art cross-references itself stylistically, and home design is simply an applied art form.  Cross-referencing is king - it's the principle that makes everything seem to "go together".  In this case, I chose this ballastly-challenged fixture in no small measure because it stylistically echoes the washer and dryer as well as conforming to our dimensional limitations. 
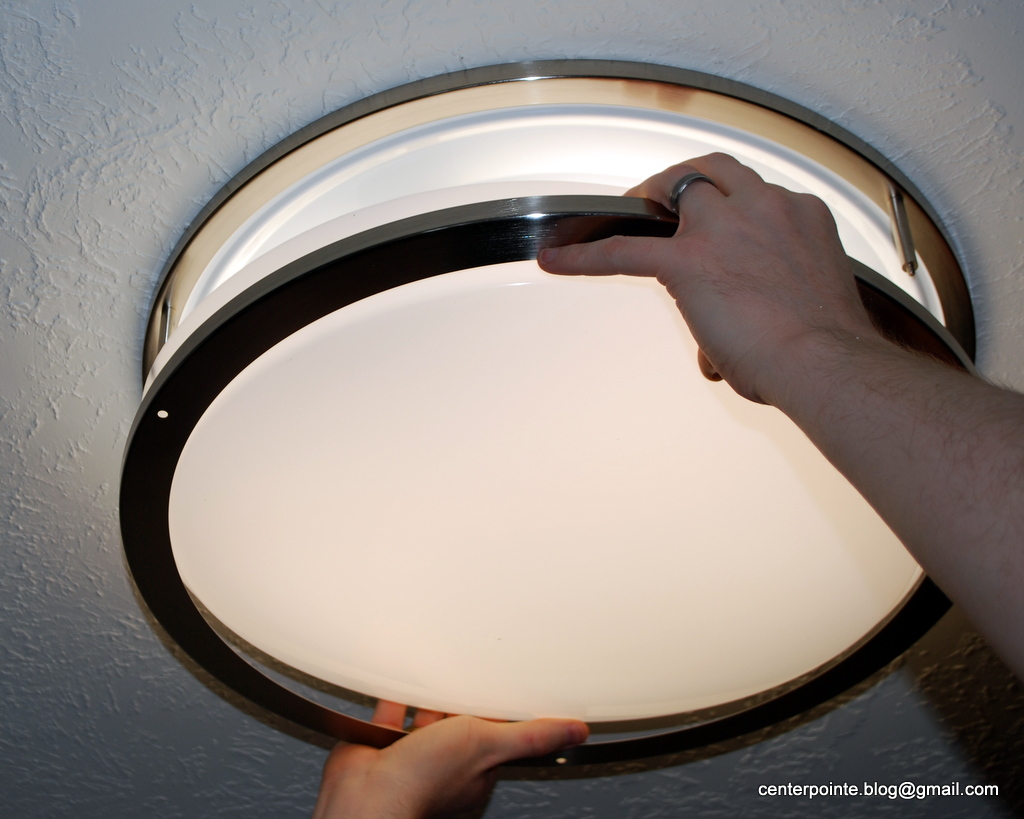
The hubster hard at work.  That's the bottom portion of the fixture in his hand.  The coincidental similarity leads to a cohesive look for the room.   
I don't particularly like the specialized bulbs that this thing takes.  It's not like they can be picked up at any convenience store. 
But those bulbs were another trade-off because stylistically, this thing works in our space.  And it goes together very easily, with the bottom portion attaching via three decorative nuts. 
And voila, the final result.  I'm contemplating whether to have a betting pool on how long its ballast will last.  But the thing will sure look better than a tube strip in the meantime. 

Thursday, March 7, 2013

Mail mysteries

The League City Post Office continues to perplex me, as it did back in December when we were having serious issues with it

This latest issue involved a critical document that one of my subcontractors Express Mail'd to me for delivery by noon.  This early delivery cost me about twenty-three bucks and I was actively waiting for it.

The mail carrier brought the envelope to my door, rang the bell, and then immediately walked back toward the USPS truck with envelope in hand (it required a delivery signature), without so much as a token effort to see if someone actually answered the door. 

I could see this event unfolding through my front window, because I was sitting eleven feet from the door.  I sprang at the door and yelled something that was reasonably civilized but clearly exasperated, "Um, you might want to wait just ten seconds after you ring the bell to give folks time to answer."  No comment from the carrier - just a slow shuffle back toward the front door and thankfully I was then able to sign for my envelope.  If I had been twenty feet from the door instead of eleven (I measured it), I'm not sure that I would have been able to get to the door on time. 

Perhaps I'm just overly suspicious of this Post Office because of what happened to us in December, but this whole thing struck me as a little weird.  It's entirely possible that there was a sudden and compelling reason for the carrier to wheel around and return to the mail truck without any reasonable attempt to wait for the door to be answered.  If so, I don't know that circumstance might have been. 

The above discourse represents my subjective personal opinion as to what transpired in this instance.  One of our security cameras recorded an objective version. 

Wednesday, March 6, 2013

Desert drama in a cinder cavity

One year ago, I described an unusual garden I painstakingly designed to support twenty-three species and variants of cactus and succulent plants.
It was made out of the type of cinder blocks and cement capstones available for very little money at any hardware store, and it turned a useless corner of my micro-yard into an inviting bower of sorts.  In the past year, I have spent many hours sitting on that front bench with a good book and that black tea pot you see on the ledge to the right.   
If you look at the cinder block at the lowest right-hand location in the photo above, you'll see a little white fuzzy barrel cactus, species unknown (it's whatever they had available on the half-price table at Houston Garden Centers).  Here is what that same cactus looked like yesterday:
My husband called them "Phoenix flowers" because they look like they have risen from the ashes of this withered husk of a cactus. 

But the cactus is not nearly as decrepit as it appears, obviously.  The secret lives of cacti:  How is this thing even able to photosynthesize?  I don't see a speck of green anywhere.  It doesn't seem to have grown a single millimeter in the past year, but it obviously managed to gather sufficient energy for this riotous display. 
Bluebonnets may be making the news right now, but flowering cacti also have a cult following, and there are a number of sources that provide regular updates on the status of the spring bloom, especially around areas such as Big Bend.  My husband and I are consummate Big Benders (gosh, that sounds obscene), but we're also family folk, and with the demands of school schedules, we've never been at liberty to time a trip to hit the height of the annual bloom.  Despite persistent state-wide drought, the rainfall has improved somewhat in the Trans Pecos over the past few months, and this year's bloom might turn out to be pretty good, despite the devastation caused by the drought of 2011.  Until such time as we are able to experience the likes of a good spring bloom in west Texas, I'll be nurturing my own little micro-desert in my micro-back yard.
And it's positively other-worldly. 

Monday, March 4, 2013

It's not actually communicating with the mother ship

Ever get a creepy email like this one?
Were they sure it was 31,448 miles?  Not 31,450?
When I first saw this, I had a "big brother is watching" type of Maalox moment, if you'll excuse the mixed metaphors, one of which dates me more severely than the other. 

Seriously, I thought it was one of those onboard car computer stunts that I keep reading about, such as in this piece provocatively titled "Your car as a witness for the prosecution", except instead of just recording details without my (or any other owner's) express permission, maybe the damned thing was now also transmitting that information to the dealer so that he could then justify sending me guilt-trippy emails about my (ex)laxity.

But a rising-dread dash to the garage revealed that my car doesn't actually have that many miles on it.  In fact, they must have recorded my mileage during previous service visits and simply extrapolated to arrive at that number, because the actual total is not even very close. 

They sure fufilled their purpose, though, didn't they?  They got my attention and got me off my butt with a privacy-invading flair.  As the retail giant Target recently found out the hard way by essentially announcing to a family that their teenage daughter was pregnant (oopsie!!), even if sales algorithms are sophisticated enough to glean remarkably personal information about a given customer, it's not always a good strategy to announce those results to either the target (pun intended) customer or to the world.
Where does the car stop and the computer begin?

Microsoft clip art. 
 

Sunday, March 3, 2013

Sunk by a sink

Sometimes, dear reader, people are not as dumb as they look.  Or as lazy.

Case in point: the unknown contractor who originally plumbed our kitchen sink. 
Indeed.  A very concise set of instructions on how to deal with the proverbial dastardly "builder grade" effect can be found here, whence this screengrab derived. 
First of all, let me explain that we did not order one of those uber-trendy undermount kitchen sinks when we built this house, for three reasons:

Number one - It was a hellaciously expensive option.  I can't remember the exact price, but I believe it was between $500 and $1,000 in upgrade fees. 

Number two - I've seen too many examples among my friends where the edges of their granite sinks have chipped.  And once that happens, the entire countertop looks like crap.
Oh, that just SUCKS.  Sure, you can sweep your crumbs directly into an undermounted sink bowl, but what good is it if you run the risk of having this happen?  I do very intensive cooking, lots of volume, large pots banging around.  I don't want to have to pussyfoot around my sink for fear of damage.

Screengrab from this site
Number three - I should have actually named this one number two, and you'll have to forgive me for being four days older than dirt, but I still remember the days before sewage systems were de rigueur in rural areas.  To my ancient perception, many of today's undermount sinks bear an acutely-undesirable visual resemblance to the pit toilets of yesteryear. 
Caption from this UK educational site"Most homes still had an outdoor toilets. Some were flush toilets connected to the sewerage system, others, particularly in the countryside, still had to be emptied into a cesspit."
I'm sorry - I don't want my sinks to remind me of pit toilets.  But that's just me. 

Screengrabs at random from Google image search. 
Particularly with smaller undermounts, when I see them, I want to run away because of that visual resemblance. 

So we ended up choosing a traditional drop-in kitchen sink, but of course with undermount sinks being all the current rage, there wasn't much of a choice on drop-ins.  So we just got whatever the builder default was.

Sigh.  Now for the part of the story that has been laced with expletives since the very beginning.

As soon as the contractor installed our default sink, we knew something was wrong.  Initially, they simply set the thing into the rough opening with no putty or caulking, which meant that the edge was not sealed, not waterproof, and thus would be expected to leak water into the cabinetry beneath.

Upon seeing this, I raised hell with the builder, who forced the contractor to go back and seal it.  Or at least make a feeble attempt to seal it, because this is what got done.
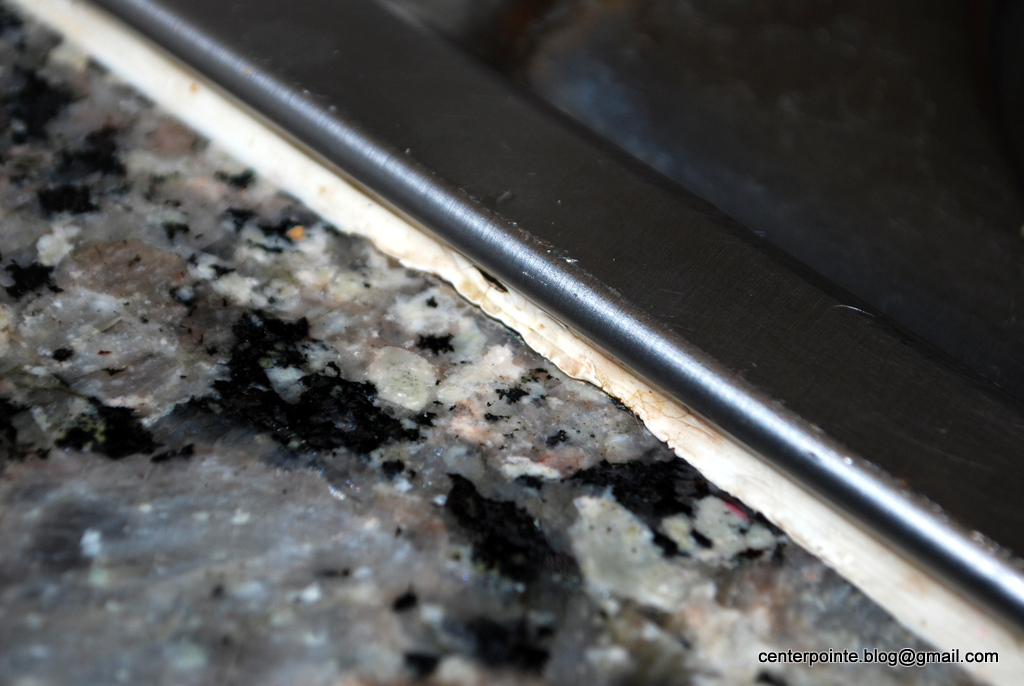
Did I mention the word SUCK?!  For crying out loud - this unknown material might be either acrylic or latex or something else, but it's not silicone and it wasn't suitable for this wet application.  You can see here that it doesn't form a tight seal with either the granite or the stainless.  And it's cruddy, not to mention unsanitary.  I had to constantly be careful that no water would slop on the counter, because it would have run right under this edge and into the cabinet below. 
A study in sealing contrasts only one inch apart:  The tiler had sealed the base of the backsplash (photo left) in clear silicone, a very neat and effective job which looks as good as new three years after it was done.  Whereas the plumber had attempted to seal the sink edge (photo right) using this white gunk which quickly fell apart. 
We were scheduled to close on the sale of our previous house only ten days after our Centerpointe target closing on this new house.  Because of the tight timing on the sale closing, we simply couldn't hold up the buy closing to resolve minor issues like this, so we had to simply say to hell with it - we will fix it ourselves at some point down the road.

"Down the road" finally translated into last weekend.  As consummate DIYers, we figured that this would be an easy job - just unclip the sink, putty it up properly, and replace.  But as soon as we started to pull it, the whole thing became increasingly odd.
Sink configurations vary, but generally, there are clips up underneath the sink, holding it in place.  You unscrew those to release it.
Here's the corner of our sink, which is shown here propped in place by a short length of wood.  We had to first clean all that white gunk from around the edges.  You can see two of the clips here - one on each side of the corner. 
But then we noticed that only the corners of this sink had been clipped during the initial install.  There were clip slots in the centers of each side, but no clips in those slots. 
We were initially figuring that we wouldn't even bother with caulk - theoretically, we could simply use plumber's putty and re-set the sink in that for a water-tight seal. 

But it kept not working for some reason.  It wouldn't set properly no matter how much we adjusted it.  So we pulled the sink back up a second time to examine it more closely, only to find...
Oh, that SUCKS!!  That just *SUCKS*!!  The danged sink rim is not planar.  It won't sit flush with the top of the counter because the entire unit is warped.  The resulting running gap varies from zero to three-eighths of an inch around the perimeter. 
This is what I meant by people not being as dumb or as lazy as they might first appear.  Now I can see why the plumber didn't initially seal this sink: he didn't do it because he realized that the sink is basically un-sealable, not because he was trying to side-step the work.  He didn't add center clips because the thing was too bowed for them to be of any real use.  We tried to add center clips and rachet the sink down into plane, but clips are only designed to hold a sink in place.  They are not designed to compensate for imprecise specifications, and every time we attempted to flatten the sink using them, they simply snapped off. 

Sigh.  What did it say in the quote about "builder grade" in the opening screengrab above? "You'll save money in the end by buying better-quality building materials".   Now we have to decide whether we want to live with this, or repurchase a better-quality sink that actually was manufactured with sufficient quality such that it sits flush with the countertop and thus can be water-sealed in a sanitary manner.  In the meantime, we crammed our existing sink's gaps with clear silicone caulk, but it's not a very effective solution.  Really, the sink needs to sit flat in the counter opening for it to function properly. 

Grrrr.  What an unnecessary headache.  I've faced a lot of home improvement oddities in my time, but never a stainless steel sink that wasn't constructed in plane. 

Saturday, March 2, 2013

Tragedy on El Dorado Boulevard

You'll forgive me the melodramatic post title, but my heart is shattered and it may never mend.

Driving up to Korean BBQ on El Dorado Blvd. yesterday, my heart was clearly not the only thing that was shattered. 
Oops!  I'm not sure what happened here, but I hope nobody was hurt.  I suspect that workers may have been trying to dismount the Korean BBQ sign when this whole section descended in an uncontrolled manner.
And why would they be trying to dismount the Korean BBQ sign?  Because, sadly, the restaurant appears to have closed.
This sign has been in the window for about the past two weeks.  The telephone is "not a working number" and obviously from this post-script refering to CenterPoint Energy, the electricity is being turned off.
This is the same restaurant I blogged about just this past November.
And it's the same restaurant that made Alison Cook's Top 100, which is pretty amazing when you consider that there are over ten thousand restaurants in our area.  Korean BBQ was arguably greater Houston's best Korean restaurant. 
I'm not sure if this restaurant is moving to a new location or is closing permanently, but the lack of a forwarding address and absence of an explanatory statement do not bode well.  Given Alison's history with the place, I'll forward this post URL to her to see if she has any 411. 

Update:  Alison has a Feb 27 Twitter entry confirming that the restaurant is closing.  I don't do Twitter so it took me a while to locate a reference to it.